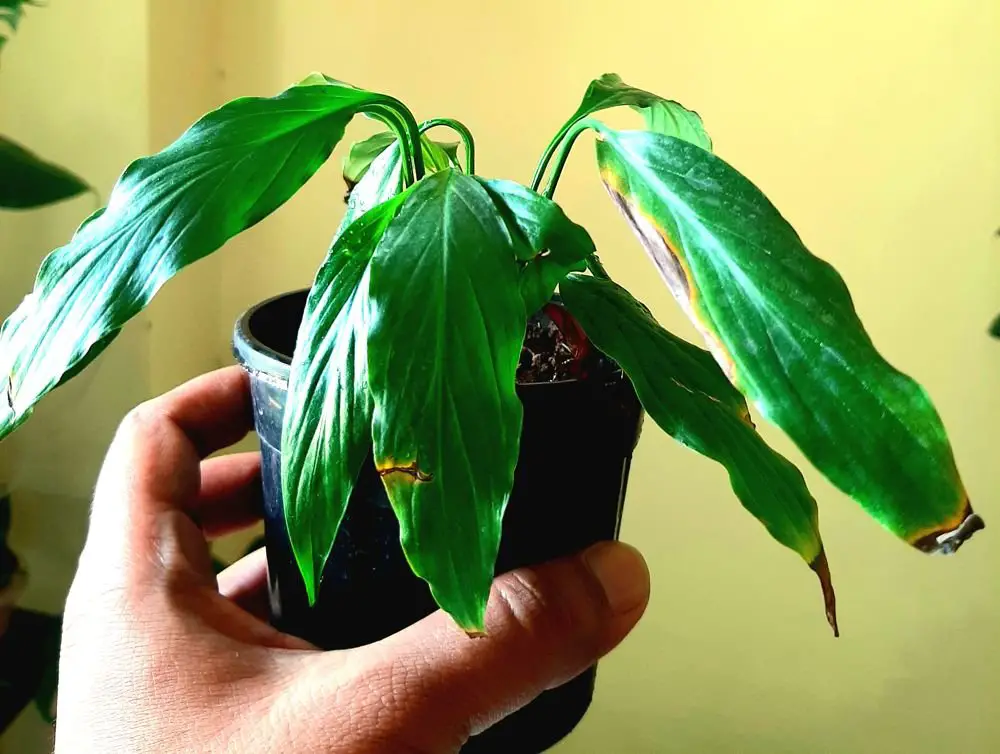
Repotting your beloved plants is a necessary part of their care, allowing them to grow and thrive. However, it can also be a stressful experience for them, often leading to that dreaded wilting. Seeing your plant droop after you’ve just tried to help it can be disheartening. But don’t worry!
Wilting after repotting is often a temporary setback, and with the right knowledge and techniques, you can minimize the stress and ensure your plant bounces back stronger than ever. This comprehensive guide, updated for 2024, will equip you with five crucial tips to prevent plant wilting after repotting, along with the latest trends, statistics, and best practices.
Why Plants Wilt After Repotting: Understanding the Stress
Before diving into the solutions, it’s important to understand why plants wilt after being repotted. The primary reason is transplant shock. Transplant shock is a term used to describe the stress a plant experiences when moved from one environment to another. This stress manifests in various ways, with wilting being one of the most common symptoms.
Root Disturbance: The Main Culprit
The roots are the lifeline of a plant, responsible for absorbing water and nutrients. Repotting inevitably involves disturbing the root system, even with the most careful techniques. This disturbance can lead to:
- Damage to Fine Root Hairs: These tiny, delicate hairs are responsible for most of the water absorption. They are easily damaged during the repotting process.
- Disruption of Root-Soil Contact: When you move a plant, you break the intimate connection between the roots and the soil, making it harder for the plant to access water.
- Root Pruning (Intentional or Unintentional): Sometimes, root pruning is necessary to fit the plant into a new pot or to remove diseased roots. While beneficial in some cases, it temporarily reduces the plant’s ability to absorb water.
Environmental Changes: Adding to the Stress
Besides root disturbance, other environmental changes can contribute to wilting:
- Change in Light Intensity: Moving a plant to a new location with different light levels can stress it.
- Change in Humidity: Different humidity levels can affect the rate of transpiration (water loss) from the leaves.
- Temperature Fluctuations: Sudden changes in temperature can shock the plant.
Statistics and Trends in Plant Care (2024)
The plant care industry is booming! Here are some key statistics and trends to keep in mind as of 2024:
repotting stress
- Increased Interest in Indoor Plants: According to a recent survey by the National Gardening Association, indoor plant ownership has increased by 20% in the last five years, especially among millennials and Gen Z.
- Sustainable Gardening Practices: There’s a growing demand for eco-friendly potting mixes, organic fertilizers, and biodegradable pots. Consumers are increasingly aware of the environmental impact of their gardening choices.
- Rise of Smart Gardening Technology: Smart sensors that monitor soil moisture, light levels, and temperature are becoming increasingly popular, helping plant owners provide optimal care.
- Specialized Potting Mixes: More gardeners are understanding the importance of using the correct type of potting mix for each plant. Demand for specialized mixes like those for succulents, orchids, and African violets is on the rise.
- Biostimulants: The use of biostimulants to help reduce transplant shock and improve overall plant health is gaining popularity. These products contain beneficial microorganisms or other substances that promote root growth and stress tolerance.
Read More: How to Grow Herbs Indoors Year-Round
Tip 1: Choose the Right Potting Mix
The foundation of healthy plant growth lies in the potting mix you choose. Selecting the correct mix is crucial for providing adequate drainage, aeration, and nutrients. Using the wrong type of soil is one of the biggest mistakes gardeners make.
Understanding Potting Mix Components
Potting mix is not the same as garden soil. It’s a specially formulated blend designed to provide the ideal growing conditions for container plants. Common components include:
- Peat Moss or Coconut Coir: These materials retain moisture and provide a good structure. Coconut coir is a more sustainable alternative to peat moss.
- Perlite or Vermiculite: These volcanic minerals improve drainage and aeration.
- Compost: Adds nutrients and beneficial microorganisms to the mix.
- Bark: Often used in mixes for orchids and other epiphytes, providing excellent drainage and aeration.
Selecting the Right Mix for Your Plant
Different plants have different needs. Here’s a general guideline:
- General Purpose Potting Mix: Suitable for most houseplants.
- Cactus and Succulent Mix: Fast-draining mix with a high proportion of sand or perlite.
- Orchid Mix: Coarse mix with bark, charcoal, and perlite for excellent drainage and aeration.
- African Violet Mix: Lightweight, slightly acidic mix that drains well.
- Seed Starting Mix: Fine textured and sterile to promote germination.
DIY Potting Mix Recipes
You can also create your own potting mix to customize it to your plant’s specific needs. Here are a couple of simple recipes:
General Purpose Potting Mix Recipe
- 1 part Peat Moss or Coconut Coir
- 1 part Perlite or Vermiculite
- 1 part Compost
Cactus and Succulent Mix Recipe
- 1 part General Purpose Potting Mix
- 1 part Coarse Sand
- 1 part Perlite or Pumice
Real-World Example: I once repotted a peace lily into a standard potting mix that was too dense. The plant started to wilt and developed root rot. After switching to a mix specifically formulated for African violets (which provides better drainage), the plant quickly recovered.
Remember to check the pH of your potting mix. Most plants prefer a slightly acidic pH (around 6.0-7.0). You can test the pH using a soil testing kit available at most garden centers.
Consider using a potting mix amended with mycorrhizae. Mycorrhizae are beneficial fungi that form a symbiotic relationship with plant roots, helping them absorb water and nutrients more efficiently. This can significantly reduce transplant shock and promote healthy growth. These mixes are trending in 2024 due to increased awareness of soil health.
Regulations regarding peat moss extraction are becoming stricter in many regions due to its environmental impact. Consider using sustainable alternatives like coconut coir, which is a renewable resource.
Don’t reuse old potting mix. It can harbor diseases and pests, and it also loses its nutrients and structure over time. Always start with fresh potting mix when repotting.
Tip 2: Repot at the Right Time and in the Right Way
The timing and method of repotting can significantly impact your plant’s ability to withstand the stress. Doing it properly can make all the difference.
Optimal Timing for Repotting
The best time to repot most plants is during their active growing season, typically in spring or early summer. During this time, plants are actively producing new roots and can recover from the stress of repotting more quickly. Avoid repotting during the dormant season (fall and winter) when growth is slowed down.
Signs Your Plant Needs Repotting:
- Roots Circling the Pot: If you see roots growing out of the drainage holes or circling the inside of the pot, it’s time to repot.
- Slow Growth: If your plant’s growth has slowed down or stopped, even with proper care, it may be root-bound.
- Water Draining Quickly: If water drains through the pot very quickly, the soil may be compacted or depleted.
- Soil Pulling Away from the Sides of the Pot: This indicates that the soil is dry and compacted.
Choosing the Right Pot Size
Select a pot that is only slightly larger than the current one, typically 1-2 inches wider in diameter. Over-potting (moving to a pot that is too large) can lead to root rot because the soil stays too wet for too long.
Ensure the new pot has adequate drainage holes. Poor drainage is a common cause of root rot and plant death.
Repotting Techniques to Minimize Stress
- Water the Plant Thoroughly: Water the plant a day or two before repotting to hydrate the roots and make the root ball easier to handle.
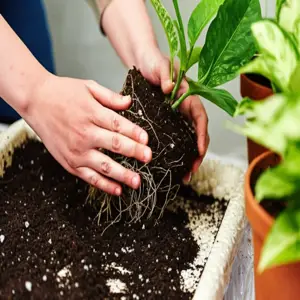
- Gently Remove the Plant from the Old Pot: Loosen the soil around the edges of the pot. Invert the pot (support the plant with your hand) and gently tap the bottom until the plant slides out. If the plant is stuck, you may need to use a knife to loosen the soil around the edges.
- Inspect the Roots: Gently remove any dead or decaying roots. If the plant is severely root-bound, you can carefully tease apart the roots or make a few vertical cuts along the root ball to encourage new growth.
- Place the Plant in the New Pot: Add a layer of fresh potting mix to the bottom of the new pot. Center the plant in the pot and fill in the sides with more potting mix, gently firming the soil around the roots. Make sure the top of the root ball is level with the top of the pot.
- Water Thoroughly: Water the plant thoroughly after repotting to settle the soil and rehydrate the roots.
Trend Alert (2024): Self-watering pots are gaining popularity as they help maintain consistent moisture levels, reducing the risk of overwatering or underwatering. However, make sure to monitor the water level and adjust as needed.
Real-World Example: I once rushed the repotting process and damaged a significant portion of the root system of my fiddle-leaf fig. The plant went into severe shock and dropped almost all of its leaves. I learned that patience and gentle handling are crucial when repotting.
When handling roots, use clean tools to prevent the spread of disease. Sterilize your pruners or scissors with rubbing alcohol before and after use.
Avoid repotting during extreme weather conditions, such as heatwaves or cold snaps. These conditions can further stress the plant.
Tip 3: Provide Proper Watering and Humidity
Watering and humidity play a vital role in helping your plant recover after repotting. Finding the right balance is key.
Watering After Repotting: A Delicate Balance
Immediately after repotting, water the plant thoroughly until water drains out of the drainage holes. This helps settle the soil and rehydrate the roots. However, be careful not to overwater, as this can lead to root rot, especially in a new pot with fresh soil.
Monitoring Soil Moisture:
The best way to determine when to water is to check the soil moisture level. You can use your finger or a moisture meter to check the moisture content a few inches below the surface. Water when the top inch or two of soil feels dry to the touch. The *_watering needs_* will be unique to the plant.
Watering Techniques:
- Bottom Watering: Place the pot in a saucer of water and allow the plant to absorb water from the bottom. This encourages root growth and prevents overwatering.
- Top Watering: Water the plant slowly and evenly, allowing the water to saturate the soil. Avoid getting water on the leaves, as this can lead to fungal diseases.
Humidity: Creating a Supportive Environment
Increased humidity can help reduce water loss from the leaves, giving the roots time to recover. Plants transpire (lose water through their leaves), so a higher humidity lessens the amount of water lost.
Increasing Humidity:
- Misting: Mist the plant regularly with water. However, avoid misting plants with fuzzy leaves, as this can lead to fungal problems.
- Humidity Tray: Place the pot on a tray filled with pebbles and water. As the water evaporates, it increases the humidity around the plant.
- Humidifier: Use a humidifier to increase the humidity in the room.
- Grouping Plants: Grouping plants together creates a microclimate with higher humidity.
Trend Alert (2024): Plant parents are increasingly using moisture meters and self-watering systems to maintain optimal soil moisture levels, reducing the risk of overwatering or underwatering.
Real-World Example: I repotted a fern and neglected to provide adequate humidity. The fronds quickly turned brown and crispy. After placing the fern on a humidity tray and misting it regularly, it started to recover.
Avoid using softened water for watering plants. Softened water contains high levels of salt, which can damage plant roots. Use tap water that has been allowed to sit for 24 hours to allow chlorine to evaporate.
Consider using rainwater or distilled water for plants that are sensitive to tap water, such as orchids and calatheas.
Avoid watering during the hottest part of the day, as this can cause the water to evaporate too quickly and stress the plant. Water in the morning or evening.
Tip 4: Provide the Right Light and Temperature
Light and temperature play a crucial role in a plant’s recovery after repotting. Understanding what your plant needs in terms of these elements is paramount.
Light: Finding the Sweet Spot
After repotting, avoid placing your plant in direct sunlight, as this can further stress it. Instead, provide bright, indirect light. This will allow the plant to photosynthesize without losing too much water through transpiration.
Understanding Light Levels:
- Direct Sunlight: Intense sunlight that shines directly on the plant for several hours a day.
- Bright, Indirect Light: Bright light that is filtered through a curtain or located a few feet away from a sunny window.
- Medium Light: Light that is sufficient for reading a book without additional lighting.
- Low Light: Light that is barely sufficient for reading a book.
Matching Light to Your Plant:
Research the specific light requirements of your plant and provide the appropriate light level. Some plants thrive in bright, indirect light, while others prefer lower light conditions.
Temperature: Avoiding Extremes
Maintain a consistent temperature range for your plant. Avoid placing it near drafts or heating vents, as sudden temperature fluctuations can stress it. Most houseplants thrive in temperatures between 65°F and 75°F (18°C and 24°C).
Protecting from Cold:
If you live in a cold climate, protect your plant from frost and cold drafts. Move it away from windows at night or provide insulation around the pot.
Protecting from Heat:
During hot weather, avoid placing your plant in direct sunlight or near heat sources. Provide shade or move it to a cooler location.
Trend Alert (2024): Smart LED grow lights are becoming increasingly popular, allowing plant owners to provide consistent and optimal light levels, regardless of the natural light available. These lights are often programmable and can be adjusted to mimic the natural light cycle.
Real-World Example: I repotted a snake plant and placed it in direct sunlight. The leaves quickly developed sunburn. After moving it to a shadier location, the plant recovered and produced new growth.
Monitor the temperature and humidity levels in your home using a thermometer and hygrometer. Adjust the environment as needed to provide optimal conditions for your plants.
Read More: About Do Black Strawberries Exist? Unveiling the Truth
Avoid placing plants near appliances that generate heat, such as refrigerators or ovens. The heat can dry out the soil and stress the plant.
If you are using artificial light, make sure the light source is the correct distance from the plant. Too close, and the plant may burn; too far, and it won’t receive enough light.
Tip 5: Avoid Fertilizing Immediately and Consider Biostimulants
Fertilizing immediately after repotting can do more harm than good. New roots are sensitive and can be burned. Consider biostimulants to support the roots instead.
plant shock
Wait Before Fertilizing
Hold off on fertilizing your plant for at least 4-6 weeks after repotting. The fresh potting mix already contains nutrients, and the roots need time to recover before they can efficiently absorb fertilizer. Fertilizing too soon can burn the sensitive new roots. Always check the *_fertilizing needs_* for the specific plant.
Understanding Fertilizer Types:
- Slow-Release Fertilizer: Releases nutrients gradually over a period of several months.
- Liquid Fertilizer: Diluted with water and applied directly to the soil.
- Granular Fertilizer: Sprinkled on the soil surface and watered in.
Choosing the Right Fertilizer:
Select a fertilizer that is specifically formulated for your plant type. Follow the instructions on the fertilizer label carefully to avoid over-fertilizing.
Biostimulants: A Gentle Approach
Instead of fertilizing, consider using biostimulants. These products are designed to promote root growth and reduce transplant shock without burning the roots. Biostimulants are gaining popularity as a more natural and sustainable way to support plant health.
Types of Biostimulants:
- Seaweed Extract: Contains hormones and nutrients that promote root growth.
- Humic and Fulvic Acids: Improve nutrient absorption and soil structure.
- Beneficial Microbes: Help to colonize the root zone and protect against pathogens.
Applying Biostimulants:
Follow the instructions on the product label. Most biostimulants can be applied as a soil drench or foliar spray.
Trend Alert (2024): The use of mycorrhizae and other beneficial microbes is becoming increasingly common in plant care. These organisms form symbiotic relationships with plant roots, helping them to absorb water and nutrients more efficiently.
Real-World Example: I repotted a sensitive fern and, against my better judgment, fertilized it immediately. The plant’s leaves turned yellow and the plant stalled. After flushing the soil and applying a seaweed extract biostimulant, it started to recover.
Always dilute fertilizers properly to avoid burning plant roots. Start with a lower concentration than recommended and gradually increase as needed.
Avoid fertilizing plants that are already stressed or unhealthy. Focus on addressing the underlying issues before fertilizing.
Consider using organic fertilizers, which release nutrients more slowly and are less likely to burn plant roots.
Troubleshooting Wilting After Repotting
Even with the best care, your plant may still wilt after repotting. Here’s how to troubleshoot the most common issues:
post-repotting care
- Overwatering: If the soil is soggy and the leaves are yellowing, you may be overwatering. Allow the soil to dry out slightly before watering again. Ensure the pot has adequate drainage.
- Underwatering: If the soil is dry and the leaves are drooping, you may be underwatering. Water thoroughly and consider increasing the humidity.
- Root Rot: If the roots are brown and mushy, your plant may have root rot. Remove any affected roots and repot the plant in fresh potting mix.
- Light Shock: If the leaves are turning brown or yellow, the plant may be getting too much or too little light. Adjust the light level accordingly.
- Temperature Shock: If the leaves are wilting or dropping, the plant may be experiencing temperature shock. Move the plant to a location with a more stable temperature.
Patience is key. It can take several weeks or even months for a plant to fully recover from transplant shock. Continue to provide proper care and monitor the plant closely. ***_Consider joining a plant community_*** to get help from more experienced growers.
Table: Troubleshooting Wilting After Repotting
| Symptom | Possible Cause | Solution |
|---|---|---|
| Soggy soil, yellowing leaves | Overwatering | Allow soil to dry out before watering. Ensure good drainage. |
| Dry soil, drooping leaves | Underwatering | Water thoroughly. Increase humidity. |
| Brown, mushy roots | Root Rot | Remove affected roots. Repot in fresh mix. Reduce watering. |
| Brown or yellow leaves | Light Shock | Adjust light levels. Move to indirect light. |
| Wilting or dropping leaves | Temperature Shock | Move to a location with stable temperature. Avoid drafts. |
FAQ: Frequently Asked Questions About Plant Wilting After Repotting
Why is my plant wilting immediately after repotting?
Wilting immediately after repotting is often due to transplant shock. The roots have been disturbed, and the plant is struggling to absorb water as efficiently. Provide adequate humidity and indirect light to help it recover.
How long does transplant shock typically last?
Transplant shock can last from a few days to several weeks, depending on the plant’s sensitivity and the extent of root disturbance. Be patient and continue to provide proper care.
Is it normal for a plant to lose leaves after repotting?
Yes, it’s normal for a plant to lose a few leaves after repotting. This is a natural response to stress. However, excessive leaf loss could indicate a more serious problem, such as root rot or improper watering.
Should I prune my plant after repotting?
Light pruning can help reduce water loss from the leaves, giving the roots a chance to recover. Remove any dead or damaged leaves or stems. Avoid heavy pruning immediately after repotting.
Can I use rooting hormone to help my plant recover after repotting?
Yes, rooting hormone can help stimulate root growth and reduce transplant shock. Apply it to the roots during repotting according to the product instructions.
My plant is still wilting after a week. What should I do?
Reassess your care practices. Check the soil moisture, light levels, and temperature. Ensure the plant is not overwatered or underwatered. If the problem persists, consider repotting again with fresh potting mix.
How can I prevent transplant shock in the future?
Repot at the right time of year (during the active growing season), use the correct potting mix, minimize root disturbance, and provide adequate humidity and indirect light.
Is it better to repot in the morning or evening?
Repotting in the morning allows the plant to recover during the day. However, either morning or evening is fine as long as you avoid repotting during the hottest part of the day.
Can I repot a flowering plant?
It’s generally best to avoid repotting a plant while it is flowering, as this can stress it and cause the flowers to drop. If you must repot, do so carefully and gently.
What are the signs of successful recovery from transplant shock?
Signs of successful recovery include new growth, firm leaves, and improved overall appearance. The plant should gradually regain its vigor and vitality.
Conclusion: Final Thoughts on Keeping Your Plants Happy After Repotting
Repotting doesn’t have to be a stressful event for you or your plant. By understanding the causes of wilting after repotting and implementing these five key tips – choosing the right potting mix, repotting at the right time and way, providing proper watering and humidity, controlling light and temperature, and avoiding immediate fertilization while considering biostimulants – you can significantly reduce the risk of transplant shock and ensure your plant thrives in its new home. Remember that patience is key, and every plant is different.
Monitor your plant closely, adjust your care as needed, and don’t be afraid to experiment. With a little love and attention, your plant will bounce back stronger than ever, rewarding you with its beauty and vitality. The key is understanding your plant’s care needs, and adjusting as needed. Always remember to stay updated with the latest trends and best practices in plant care to provide the optimal environment for your plants to flourish. Happy repotting! It may be wise to check with local garden shops for more specific advice and guidance.
Auto Amazon Links: No products found.

VEVOR Tree Watering Bags Slow Release, 4 Pack 16 Gallons Tree Watering Ring, Reusable Refillable Tree Irrigation Ring Water Bags, Heavy Duty Watering System for Shrub Tree Root Drip Irrigation
$29.99 (as of March 3, 2026 07:54 GMT +00:00 - More info- Product prices and availability are accurate as of the date/time indicated and are subject to change. Any price and availability information displayed on [relevant Amazon Site(s), as applicable] at the time of purchase will apply to the purchase of this product.

Perfect Plants Christmas Tree Saver 8oz. | Easy Use Xmas Tree Preserver Food | Have Healthy Green Christmas Trees All Holiday Season
$16.99 (as of March 3, 2026 07:54 GMT +00:00 - More info- Product prices and availability are accurate as of the date/time indicated and are subject to change. Any price and availability information displayed on [relevant Amazon Site(s), as applicable] at the time of purchase will apply to the purchase of this product.
Mini Decorative Watering Can, Set of 6, Height 1.97 inch, Cute Metal Jug for Hand Crafts,Garden Theme Parties and Home Decor
$8.99 (as of March 3, 2026 07:54 GMT +00:00 - More info- Product prices and availability are accurate as of the date/time indicated and are subject to change. Any price and availability information displayed on [relevant Amazon Site(s), as applicable] at the time of purchase will apply to the purchase of this product.
Mini Handmade Decorative Watering Can, Set of 6, Height 1.42 inch, Cute Metal Jug for Hand Crafts,Garden Theme Parties,Home Decor and Accessories of Refrigerator Magnets (Silver, Height 1.42 inch)
$13.99 (as of March 3, 2026 07:54 GMT +00:00 - More info- Product prices and availability are accurate as of the date/time indicated and are subject to change. Any price and availability information displayed on [relevant Amazon Site(s), as applicable] at the time of purchase will apply to the purchase of this product.
Wilt-Pruf® Christmas Tree/Cutting Preserver Spray |Preserves Christmas Trees, Wreaths, Garlands, Cuttings and Carved Pumpkins | Reduces Needle Drop | Keeps Cut Trees Fresh Longer | Natural (32 oz)
$21.99 (as of March 3, 2026 07:54 GMT +00:00 - More info- Product prices and availability are accurate as of the date/time indicated and are subject to change. Any price and availability information displayed on [relevant Amazon Site(s), as applicable] at the time of purchase will apply to the purchase of this product.

TERRO Ant Killer Bait Stations T300B - Liquid Bait to Eliminate Ants - Bait System - 12 Count Stations for Effective Indoor Ant Control
$11.97 (as of March 3, 2026 14:38 GMT +00:00 - More info- Product prices and availability are accurate as of the date/time indicated and are subject to change. Any price and availability information displayed on [relevant Amazon Site(s), as applicable] at the time of purchase will apply to the purchase of this product.
OLANLY Dog Door Mat for Muddy Paws 30x20, Absorbs Moisture and Dirt, Absorbent Non-Slip Washable Doormat, Quick Dry Chenille Mud Mat for Dogs, Entry Indoor Entryway Carpet for Inside Floor, Grey
$9.49 (as of March 3, 2026 14:38 GMT +00:00 - More info- Product prices and availability are accurate as of the date/time indicated and are subject to change. Any price and availability information displayed on [relevant Amazon Site(s), as applicable] at the time of purchase will apply to the purchase of this product.
HOME GROWN Zinnia Dahlia Seeds Pack for 2026 Non GMO 524 Flower Seeds | Vibrant Zinnia Elegans for Pollinator Gardens, Borders & Containers | Easy-to-Grow Outdoor Blooms
$7.99 (as of March 3, 2026 14:38 GMT +00:00 - More info- Product prices and availability are accurate as of the date/time indicated and are subject to change. Any price and availability information displayed on [relevant Amazon Site(s), as applicable] at the time of purchase will apply to the purchase of this product.

Zevo Flying Insect Trap Official Refill Cartridges - Fits Both Zevo Trap & MAX Indoor Fly Trap - Authentic Trap+Lock Technology to Catch Gnats, House & Fruit Flies (4 Official Refill Cartridges)
$14.97 (as of March 3, 2026 14:38 GMT +00:00 - More info- Product prices and availability are accurate as of the date/time indicated and are subject to change. Any price and availability information displayed on [relevant Amazon Site(s), as applicable] at the time of purchase will apply to the purchase of this product.

Wagner's 53002 Farmer's Delight Wild Bird Food with Cherry Flavor, 10-Pound Bag
$12.48 (as of March 3, 2026 14:38 GMT +00:00 - More info- Product prices and availability are accurate as of the date/time indicated and are subject to change. Any price and availability information displayed on [relevant Amazon Site(s), as applicable] at the time of purchase will apply to the purchase of this product.