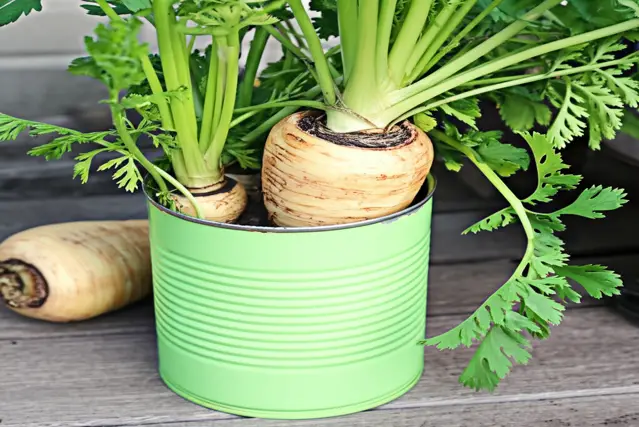
Dreaming of fresh, homegrown parsnips but short on garden space? You’re in luck! Growing parsnips in tin cans is a fun, accessible way to enjoy these sweet, earthy root vegetables, even if you only have a balcony or patio.
This comprehensive guide will walk you through every step, from prepping your cans to harvesting your very own parsnips.
Why Grow Parsnips in Tin Cans?
Parsnips are typically grown in gardens because of their long root structure, but with the right approach, they can thrive in containers. Here’s why growing them in tin cans is a great idea:
- Space-Saving: Perfect for small spaces like apartments, balconies, and patios.
- Upcycling: Give old tin cans a new life and reduce waste.
- Portability: Easily move your parsnips around to find the best sunlight.
- Control: Better control over soil quality and watering.
- Easy to Start: A simple project for beginner gardeners.
Getting Started: What You’ll Need
Before you dive in, gather these essential supplies:
- Tin Cans: Choose large cans (at least 8 inches in diameter and 12 inches deep) to accommodate the parsnip roots. Ensure they are clean and free of any sharp edges.
- Parsnip Seeds: Select a variety suitable for your climate and growing conditions. Fresh seeds are crucial for good germination.
- Potting Mix: Use a high-quality, well-draining potting mix. Avoid garden soil, as it can compact in containers.
- Drill or Nail and Hammer: For creating drainage holes in the cans.
- Watering Can or Hose: For regular watering.
- Fertilizer: A balanced, slow-release fertilizer to provide essential nutrients.
- Gloves: To protect your hands.
Step-by-Step Guide to Growing Parsnips in Tin Cans
Follow these steps to ensure a successful parsnip harvest:
Step 1: Preparing the Tin Cans
Proper preparation is key to creating a suitable growing environment for your parsnips.
- Clean the Cans: Thoroughly wash the tin cans with soap and water to remove any residue. Rinse well and allow them to dry completely.
- Create Drainage Holes: Use a drill or a nail and hammer to create several drainage holes in the bottom of each can. This is crucial to prevent waterlogging, which can lead to root rot. Aim for at least four to five holes.
- Optional: Paint the Cans: While not necessary, painting the cans can improve their appearance and protect them from rust. Use a non-toxic, weather-resistant paint. Let the paint dry completely before proceeding.
Step 2: Choosing the Right Potting Mix
The right potting mix is essential for healthy parsnip growth. Parsnips need well-draining soil to prevent root rot and to allow their roots to develop properly.
- Use a High-Quality Potting Mix: Avoid using garden soil in your tin cans. Garden soil tends to compact in containers, which can restrict root growth and drainage. Instead, opt for a commercial potting mix specifically designed for container gardening.
- Consider Adding Amendments: To improve drainage and aeration, consider adding perlite or vermiculite to your potting mix. These amendments will help keep the soil loose and prevent it from becoming waterlogged.
- Check the pH Level: Parsnips prefer a slightly acidic to neutral soil pH, ideally between 6.0 and 7.0. You can test the pH of your potting mix using a soil test kit and adjust it if necessary by adding lime to raise the pH or sulfur to lower it.
If you’re also interested in other gardening projects, consider learning about the best soil for propagating snake plants. Understanding soil types is crucial for all types of plants.
Step 3: Planting the Parsnip Seeds
Planting parsnip seeds correctly is crucial for successful germination and growth. Follow these steps to ensure your parsnips get off to a good start:
- Fill the Cans: Fill each tin can with the prepared potting mix, leaving about an inch of space at the top.
- Sow the Seeds: Parsnip seeds can be slow to germinate, so it’s important to sow them properly. Sow the seeds about ½ inch deep and 1 inch apart. Place two to three seeds in each spot to increase the chances of germination.
- Water Gently: After sowing the seeds, water the potting mix gently to moisten it. Avoid overwatering, as this can cause the seeds to rot.
- Cover the Cans (Optional): To help retain moisture and warmth, you can cover the tin cans with plastic wrap or a clear plastic bag. This will create a mini-greenhouse effect, which can speed up germination. Remove the cover once the seedlings emerge.
Step 4: Providing the Right Growing Conditions
Parsnips need specific growing conditions to thrive. Here’s what to keep in mind:
- Sunlight: Parsnips need at least 6-8 hours of direct sunlight per day. Place your tin cans in a sunny location, such as a south-facing balcony or patio. If you don’t have enough natural light, consider using grow lights to supplement.
- Watering: Keep the soil consistently moist but not waterlogged. Water deeply whenever the top inch of soil feels dry to the touch. Avoid overhead watering, as this can promote fungal diseases.
- Temperature: Parsnips prefer cool temperatures, ideally between 60-70°F (15-21°C). They can tolerate light frost, which can actually improve their flavor.
- Fertilizing: Parsnips are heavy feeders and benefit from regular fertilization. Apply a balanced, slow-release fertilizer at planting time and then every 4-6 weeks throughout the growing season. You can also use a liquid fertilizer diluted to half strength.
If you’re thinking about growing herbs indoors as well, check out this guide on how to grow herbs indoors year round. It provides excellent tips on light and care requirements.
Step 5: Thinning the Seedlings
Once the seedlings have emerged and have a few true leaves, it’s time to thin them. Thinning involves removing some of the seedlings to provide enough space for the remaining ones to grow. This is important because overcrowding can lead to stunted growth and reduced yields.
- Identify the Strongest Seedlings: Choose the strongest, healthiest-looking seedlings in each can. These are the ones you’ll want to keep.
- Remove the Weaker Seedlings: Gently pinch off the weaker seedlings at soil level, being careful not to disturb the roots of the remaining plants. You can also use small scissors to cut them.
- Space the Seedlings: Aim to leave only one or two seedlings per can, spaced about 3-4 inches apart. This will give the parsnips enough room to develop their roots.
Step 6: Caring for Your Parsnips
Regular care is essential to ensure your parsnips grow healthy and strong. Here are some key care tips:
- Weeding: Keep the tin cans free of weeds, which can compete with the parsnips for nutrients and water. Gently pull out any weeds that emerge, being careful not to disturb the parsnip roots.
- Mulching: Apply a layer of mulch around the parsnips to help retain moisture, suppress weeds, and regulate soil temperature. Organic mulches like straw, shredded leaves, or wood chips work well.
- Pest and Disease Control: Monitor your parsnips regularly for signs of pests or diseases. Common pests include aphids, carrot rust flies, and slugs. Diseases can include powdery mildew and root rot. Take action promptly to control any problems that arise.
- For aphids, you can spray the plants with a solution of soapy water or use insecticidal soap.
- For carrot rust flies, use row covers to protect the plants.
- For slugs, set out beer traps or use slug pellets.
- For powdery mildew, improve air circulation and apply a fungicide if necessary.
- For root rot, ensure good drainage and avoid overwatering.
If you encounter issues like white spots on basil leaves (even if you’re not growing basil), understanding common plant problems can help you diagnose issues with your parsnips too.
Step 7: Harvesting Your Parsnips
Parsnips are typically ready to harvest in the fall, after the first frost. Frost actually improves their flavor by converting starches into sugars. Here’s how to harvest them:
- Check for Maturity: Parsnips are ready to harvest when the roots are about 1-2 inches in diameter at the crown and 6-8 inches long.
- Loosen the Soil: Gently loosen the soil around the parsnips with a garden fork or trowel. Be careful not to damage the roots.
- Pull the Parsnips: Grasp the parsnips at the base of the foliage and gently pull them out of the soil. If they are difficult to pull, use the garden fork to loosen the soil further.
- Clean and Store: Brush off any excess soil from the parsnips and wash them gently. Store them in a cool, dark place, such as the refrigerator, for up to several months.
Tips for a Bountiful Parsnip Harvest
Follow these tips to maximize your parsnip yield and enjoy a delicious harvest:
- Use Fresh Seeds: Parsnip seeds have a short shelf life, so it’s important to use fresh seeds for the best germination rates.
- Prepare the Soil Well: Parsnips need loose, well-draining soil to develop properly. Amend your potting mix with compost or other organic matter to improve its fertility and texture.
- Water Consistently: Parsnips need consistent moisture to thrive. Water deeply whenever the top inch of soil feels dry to the touch.
- Fertilize Regularly: Parsnips are heavy feeders and benefit from regular fertilization. Apply a balanced, slow-release fertilizer at planting time and then every 4-6 weeks throughout the growing season.
- Thin the Seedlings: Thinning the seedlings is essential to provide enough space for the remaining plants to grow. Aim to leave only one or two seedlings per can, spaced about 3-4 inches apart.
- Protect from Pests and Diseases: Monitor your parsnips regularly for signs of pests or diseases. Take action promptly to control any problems that arise.
- Harvest After Frost: Frost improves the flavor of parsnips by converting starches into sugars. Harvest your parsnips after the first frost for the best taste.
Troubleshooting Common Parsnip Problems
Even with the best care, you may encounter some problems while growing parsnips. Here are some common issues and how to address them:
- Poor Germination: Parsnip seeds can be slow to germinate and may have a low germination rate. To improve germination, use fresh seeds, sow them properly, and keep the soil consistently moist.
- Stunted Growth: Stunted growth can be caused by a variety of factors, including poor soil, lack of nutrients, insufficient sunlight, and overcrowding. Make sure your parsnips have well-draining, fertile soil, at least 6-8 hours of direct sunlight per day, and enough space to grow.
- Root Rot: Root rot is caused by overwatering and poor drainage. To prevent root rot, ensure your tin cans have good drainage, use a well-draining potting mix, and avoid overwatering.
- Pest Infestations: Parsnips can be susceptible to various pests, including aphids, carrot rust flies, and slugs. Monitor your plants regularly for signs of pests and take action promptly to control any problems that arise.
- Diseases: Parsnips can also be affected by various diseases, including powdery mildew and leaf spot. Improve air circulation, avoid overhead watering, and apply a fungicide if necessary to control diseases.
Parsnip Varieties for Container Gardening
While most parsnip varieties can be grown in containers, some are better suited than others due to their size and growth habits. Here are some recommended varieties for growing in tin cans:
- ‘Guernsey Half Long’: This variety is compact and well-suited for container gardening. It produces short, thick roots with excellent flavor.
- ‘White Gem’: ‘White Gem’ is another compact variety that grows well in containers. It has smooth, white roots with a sweet, nutty flavor.
- ‘Tender and True’: This variety is known for its excellent flavor and smooth, white roots. It’s a good choice for container gardening, but it may require a slightly larger container than the other varieties.
Creative Ideas for Your Tin Can Parsnip Garden
Growing parsnips in tin cans is not only practical but also a great way to get creative with your garden. Here are some ideas to inspire you:
- Vertical Garden: Create a vertical parsnip garden by stacking the tin cans on a tiered shelf or hanging them from a wall. This is a great way to maximize space and add visual interest to your garden.
- Painted Cans: Decorate the tin cans with colorful paints, stencils, or decoupage to add a personal touch to your garden.
- Labeling: Label each can with the parsnip variety and planting date using chalkboard paint or waterproof markers.
- Grouping: Group the tin cans together in a visually appealing arrangement. Use different sizes and shapes of cans to create a unique display.
- Companion Planting: Plant compatible herbs or flowers in the same can with your parsnips. For example, you can plant marigolds to deter pests or basil to improve the flavor of your parsnips. You can also consider what herbs can be planted together for a more diverse container garden.
Growing parsnips in tin cans is a rewarding and sustainable way to enjoy fresh, homegrown vegetables, even in limited spaces. By following these simple steps and tips, you can create a thriving container garden and harvest delicious parsnips all season long.
Nutritional Benefits of Parsnips
Beyond their delicious taste, parsnips are packed with essential nutrients that contribute to a healthy diet. Here’s a look at some of the key nutritional benefits of parsnips:
- Rich in Fiber: Parsnips are an excellent source of dietary fiber, which is important for digestive health. Fiber helps regulate bowel movements, prevent constipation, and promote a feeling of fullness, which can aid in weight management.
- High in Vitamin C: Vitamin C is a powerful antioxidant that helps protect the body against damage from free radicals. It also supports immune function, promotes wound healing, and aids in collagen production.
- Good Source of Potassium: Potassium is an essential mineral that helps regulate blood pressure, maintain fluid balance, and support muscle and nerve function.
- Contains Folate: Folate, also known as vitamin B9, is important for cell growth and development. It is especially important for pregnant women, as it helps prevent neural tube defects in developing fetuses.
- Provides Manganese: Manganese is a trace mineral that plays a role in bone health, wound healing, and metabolism.
- Low in Calories: Parsnips are relatively low in calories, making them a healthy addition to any diet.
Incorporating parsnips into your meals can provide a wide range of health benefits. Whether roasted, mashed, or added to soups and stews, parsnips are a nutritious and delicious vegetable that can support your overall well-being.
Creative Ways to Use Your Homegrown Parsnips
Now that you’ve successfully grown and harvested your parsnips, it’s time to get creative in the kitchen! Here are some delicious and inspiring ways to use your homegrown parsnips:
- Roasted Parsnips: Roasting parsnips brings out their natural sweetness and nutty flavor. Simply toss them with olive oil, herbs, and spices, and roast in the oven until tender and caramelized.
- Mashed Parsnips: Mashed parsnips are a delicious and healthy alternative to mashed potatoes. Boil or steam the parsnips until tender, then mash them with butter, milk, and seasonings.
- Parsnip Soup: Parsnip soup is a comforting and flavorful dish that’s perfect for chilly days. Sauté the parsnips with onions, garlic, and other vegetables, then simmer in broth until tender. Blend until smooth and creamy.
- Parsnip Fries: Parsnip fries are a fun and healthy alternative to potato fries. Cut the parsnips into sticks, toss with olive oil and spices, and bake or air fry until crispy.
- Parsnip Cake: Yes, you can even make cake with parsnips! Grated parsnips add moisture and sweetness to cakes and muffins. They’re a great way to sneak extra vegetables into your diet.
- Parsnip Purée: A smooth parsnip purée makes a sophisticated side dish. It pairs well with roasted meats, poultry, and fish.
With their versatile flavor and nutritional benefits, parsnips are a wonderful addition to any meal. Experiment with different recipes and cooking methods to discover your favorite ways to enjoy these delicious root vegetables.
Additional Container Gardening Tips
Growing parsnips in tin cans is a fantastic start, but container gardening offers so much more! Here are some additional tips to help you expand your green thumb:
- Choosing the Right Container Size: Different plants have different space requirements. Make sure to select containers that are appropriately sized for the plants you want to grow.
- Proper Drainage: As with parsnips, drainage is crucial for most container plants. Ensure your containers have adequate drainage holes to prevent waterlogging.
- Selecting the Right Potting Mix: Use a high-quality potting mix that provides good drainage, aeration, and nutrient retention. Avoid using garden soil in containers, as it can compact and restrict root growth.
- Watering Techniques: Water your container plants regularly, but avoid overwatering. Check the soil moisture before watering and adjust your watering schedule based on the weather and the needs of your plants.
- Fertilizing: Container plants need regular fertilization to thrive. Use a balanced, slow-release fertilizer or a liquid fertilizer diluted to half strength.
- Sunlight: Provide your container plants with the appropriate amount of sunlight. Most vegetables and herbs need at least 6-8 hours of direct sunlight per day.
- Pest and Disease Control: Monitor your container plants regularly for signs of pests and diseases. Take action promptly to control any problems that arise.
- Vertical Gardening: Maximize space by using vertical gardening techniques. Grow climbing plants on trellises or in hanging baskets.
- Succession Planting: Extend your harvest by using succession planting techniques. Plant new seeds or seedlings every few weeks to ensure a continuous supply of fresh produce.
With these additional tips, you can create a thriving container garden that provides you with fresh vegetables, herbs, and flowers throughout the growing season. Happy gardening!
What are the best varieties of parsnips to grow in tin cans?
Compact varieties like ‘Guernsey Half Long’ and ‘White Gem’ are ideal for container gardening due to their smaller size.
How deep should the tin cans be for growing parsnips?
The tin cans should be at least 12 inches deep to accommodate the long roots of parsnips.
How often should I water my parsnips in tin cans?
Water deeply whenever the top inch of soil feels dry. Consistency is key, but avoid overwatering to prevent root rot.
What kind of fertilizer is best for parsnips grown in tin cans?
A balanced, slow-release fertilizer is best. Apply it at planting time and then every 4-6 weeks during the growing season.
How much sunlight do parsnips need when grown in tin cans?
Parsnips need at least 6-8 hours of direct sunlight per day. Choose a sunny location for your tin can garden.
How do I prevent root rot in parsnips grown in tin cans?
Ensure the tin cans have adequate drainage holes and use a well-draining potting mix. Avoid overwatering and waterlogging.
When is the best time to harvest parsnips grown in tin cans?
Harvest in the fall after the first frost, as frost improves their flavor. The roots should be about 1-2 inches in diameter.
How can I improve the germination rate of parsnip seeds in tin cans?
Use fresh seeds, sow them properly (½ inch deep), keep the soil consistently moist, and consider covering the cans with plastic wrap until seedlings emerge.
Are there any pests that commonly affect parsnips grown in tin cans?
Yes, common pests include aphids, carrot rust flies, and slugs. Monitor your plants regularly and take action promptly if you notice any problems.
Can I grow other vegetables or herbs with parsnips in the same tin can?
Companion planting can be beneficial. Marigolds can deter pests, and basil can improve the flavor of parsnips. Ensure there’s enough space for each plant to thrive. Alternatively, you can learn can you plant lemon balm and cilantro together to get other ideas about planting together.
Conclusion
Growing parsnips in tin cans offers an accessible and space-saving solution for enjoying homegrown vegetables, regardless of your gardening space. By understanding the specific needs of parsnips, such as well-draining soil, consistent watering, and adequate sunlight, you can successfully cultivate these sweet and nutritious root vegetables in containers. The key lies in preparing the tin cans properly, selecting the right potting mix, and providing consistent care throughout the growing season.
Remember, using fresh seeds and protecting your plants from pests and diseases are crucial for a bountiful harvest. Beyond the practical benefits, this method encourages creativity and sustainability, turning discarded tin cans into thriving mini-gardens. Whether you’re a seasoned gardener or a beginner, growing parsnips in tin cans is a rewarding way to connect with nature and enjoy the fruits (or vegetables!) of your labor.
So, gather your supplies, follow this comprehensive guide, and embark on your tin can parsnip growing adventure. You’ll not only enjoy the satisfaction of growing your own food but also contribute to a more sustainable lifestyle. Happy gardening, and get ready to savor the delicious, homegrown parsnips from your unique container garden!
Auto Amazon Links: No products found.

REMIAWY Tree Watering Bag 20 Gallon Watering Bag for Trees with Heavy Duty Zipper Premium PVC Slow Release Drippers (5-8 Hours Releasing Time)
$15.99 (as of March 24, 2026 12:45 GMT +00:00 - More info- Product prices and availability are accurate as of the date/time indicated and are subject to change. Any price and availability information displayed on [relevant Amazon Site(s), as applicable] at the time of purchase will apply to the purchase of this product.

VEVOR Tree Watering Bag Slow Release, 4 Pack 20 Gallons Tree Watering Bags/Ring, Reusable Refillable Tree Irrigation Ring Water Bags, Heavy Duty Watering System for Shrub Tree Root Drip Irrigation
$39.90 (as of March 24, 2026 12:45 GMT +00:00 - More info- Product prices and availability are accurate as of the date/time indicated and are subject to change. Any price and availability information displayed on [relevant Amazon Site(s), as applicable] at the time of purchase will apply to the purchase of this product.
20 Gallon Tree Watering Bag 6Pcs, Slow Release Drip Irrigation for New Trees, Durable PVC Deep Root Watering Device for Water Saving, Garden & Orchard
$49.99 (as of March 24, 2026 12:45 GMT +00:00 - More info- Product prices and availability are accurate as of the date/time indicated and are subject to change. Any price and availability information displayed on [relevant Amazon Site(s), as applicable] at the time of purchase will apply to the purchase of this product.
Perfect Plants Christmas Tree Saver 8oz. | Easy Use Xmas Tree Preserver Food | Have Healthy Green Christmas Trees All Holiday Season
$16.99 (as of March 24, 2026 12:45 GMT +00:00 - More info- Product prices and availability are accurate as of the date/time indicated and are subject to change. Any price and availability information displayed on [relevant Amazon Site(s), as applicable] at the time of purchase will apply to the purchase of this product.

TITECK 20 Gallon Tree Watering Bag, Tree Watering Bags Slow Release, Portable Tree Bags for Watering, Great for Newly Plants/Garden/Shrubs (3 Packs)
$19.99 (as of March 24, 2026 12:45 GMT +00:00 - More info- Product prices and availability are accurate as of the date/time indicated and are subject to change. Any price and availability information displayed on [relevant Amazon Site(s), as applicable] at the time of purchase will apply to the purchase of this product.