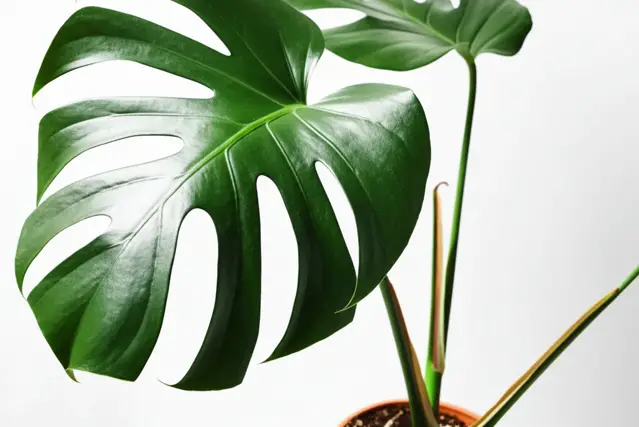
The Monstera deliciosa, with its iconic split leaves, is a beloved houseplant. Its dramatic foliage adds a touch of the tropics to any indoor space. But what happens when your Monstera gets too big, or you want to share the love with friends?
That’s where separation comes in. This comprehensive guide will walk you through the process of separating your Monstera, ensuring healthy growth for both the parent plant and its new offspring. We’ll cover everything from assessing your plant’s readiness to providing the perfect aftercare, keeping you up-to-date with the latest trends and best practices in Monstera propagation.
Why Separate Your Monstera? Understanding the Benefits
Separating a Monstera isn’t just about making more plants; it offers several advantages:
- Controlling Size: Monsteras can become quite large, especially if given the right conditions. Separating allows you to manage its size and prevent it from outgrowing its space.
- Promoting Healthier Growth: Overcrowding can lead to nutrient deficiencies and reduced airflow. Separating plants gives each individual section more space to thrive.
- Creating New Plants: The most obvious benefit! You can propagate new Monsteras to expand your plant collection or give away as gifts.
- Rejuvenating the Parent Plant: Removing older, less productive sections can encourage the parent plant to produce new growth.
According to a 2023 survey by the National Gardening Association, indoor plant ownership has seen a significant rise, with Monsteras ranking among the most popular choices. This increased interest has led to a surge in online resources and community forums dedicated to Monstera care, making information sharing and collaborative learning easier than ever.
You can find many such forums on sites like Reddit (r/Monstera) and Facebook. This popularity is also reflected in the plant market, with healthy, well-propagated Monstera cuttings fetching a good price. So, not only are you improving the health and managing the size of your plant, but you are also participating in a trending and thriving community.
Is Your Monstera Ready for Separation? Assessing the Plant’s Condition
Before you grab your tools, it’s crucial to determine if your Monstera is actually ready for separation. Here’s what to look for:
Signs Your Monstera is Ready:
- Multiple Growth Points: A mature Monstera will often develop multiple stems or growth points emerging from the soil. These are essentially separate plants growing together in the same pot.
- Overcrowded Root System: If you notice roots circling the inside of the pot or emerging from the drainage holes, it’s a sign the plant is root-bound and could benefit from separation.
- Established Aerial Roots: Aerial roots are the thick, brown roots that grow out from the stem. These roots can be used to propagate new plants. Look for aerial roots that are at least a few inches long.
- Overall Health: Ensure your Monstera is generally healthy and not suffering from any diseases or pest infestations before attempting separation. A healthy plant will recover much faster.
Signs to Wait:
- Young Plant: If your Monstera is still relatively young and only has a single stem, it’s best to wait until it matures further before attempting separation.
- Stressed Plant: If your Monstera is showing signs of stress, such as yellowing leaves or stunted growth, it’s best to address the underlying issue before adding the stress of separation. Common causes of stress include overwatering, underwatering, and pest infestations.
- Dormant Period: Avoid separating your Monstera during its dormant period (typically in the winter months) as growth will be slower, and the plants will be more susceptible to stress.
Real-World Example: I waited until my Monstera had three distinct stems, each with its own set of aerial roots, before deciding to separate it. I also noticed roots emerging from the drainage holes, indicating it was becoming root-bound. This was the perfect signal that it was time!
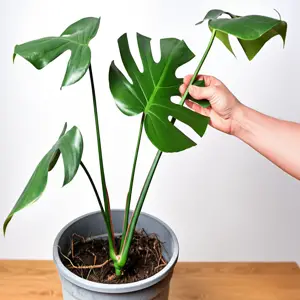
monstera propagation
Tools and Materials You’ll Need
Having the right tools and materials on hand will make the separation process much smoother and increase your chances of success.
- Sharp, Clean Knife or Pruning Shears: Essential for making clean cuts through the root ball and stems. Sterilize your cutting tool with rubbing alcohol to prevent the spread of diseases.
- New Pot(s): Choose pots that are appropriately sized for the individual sections you’ll be planting. Ensure they have drainage holes.
- Well-Draining Potting Mix: A mix specifically formulated for aroids (like Monsteras) is ideal. These mixes typically contain ingredients like perlite, orchid bark, and coco coir to improve drainage and aeration.
- Watering Can or Hose: For watering the plants after potting.
- Gloves (Optional): To protect your hands from dirt and potential irritants.
- Rooting Hormone (Optional): Can encourage faster root growth, but it’s not strictly necessary.
- Rubbing Alcohol or Bleach Solution: For sterilizing your tools.
- Towel or Tarp: To protect your working surface.
Current Trend: Sustainable potting mixes are becoming increasingly popular. Look for mixes that incorporate recycled materials or are peat-free, aligning with the growing environmental awareness in the gardening community.
Step-by-Step Guide to Separating Your Monstera
Now, let’s get down to the actual separation process. Follow these steps carefully for the best results:
Step 1: Preparing the Plant
- Water the Monstera a day or two before separating: This will help loosen the soil and make it easier to work with.
- Lay down a towel or tarp: This will protect your working surface from dirt and debris.
- Gently remove the Monstera from its pot: If the plant is root-bound, you may need to gently loosen the roots around the edges of the pot with your fingers or a tool before you can lift it out.
Step 2: Examining the Root Ball
Once the plant is out of the pot, carefully examine the root ball. Identify the individual stems or growth points and how they are connected. Look for natural divisions in the root system. This will help you determine where to make your cuts.
Step 3: Separating the Sections
- Gently tease apart the roots: Use your fingers to loosen the soil and gently separate the roots of each section. Be careful not to break too many roots in the process.
- Use your sterilized knife or pruning shears to cut through any remaining connecting roots: Make clean cuts to minimize damage to the roots. Focus on separating the sections along natural divisions in the root system.
- If you encounter any tangled roots, try soaking the root ball in a bucket of water for a few minutes to loosen them: This can make it easier to tease them apart without causing damage.
Step 4: Planting the Separated Sections
- Choose appropriately sized pots for each section: The pots should be just slightly larger than the root ball of each section.
- Fill the bottom of each pot with a layer of well-draining potting mix: This will provide a good base for the roots.
- Place each section in its new pot: Gently spread out the roots and ensure the plant is sitting at the correct depth. The top of the root ball should be level with the surface of the soil.
- Fill the pot with potting mix, gently patting it down around the roots: Be sure to leave some space at the top of the pot for watering.
- Water thoroughly: Water until water drains out of the drainage holes. This will help settle the soil and ensure the roots are well-hydrated.
Step 5: Providing Initial Care
- Place the newly separated plants in a location with bright, indirect light: Avoid direct sunlight, which can scorch the leaves.
- Keep the soil consistently moist but not waterlogged: Water when the top inch of soil feels dry to the touch.
- Increase humidity: Monsteras thrive in humid environments. You can increase humidity by misting the plants regularly, placing them on a pebble tray filled with water, or using a humidifier.
- Avoid fertilizing for the first few weeks: Allow the plants to adjust to their new environment before fertilizing.
Real-World Example: When separating my Monstera, I found that one section had very few roots. To give it a better chance of survival, I dipped the cut end of the stem in rooting hormone before planting it. This helped stimulate root growth and increased its chances of successfully establishing in its new pot.
Troubleshooting Common Issues After Separation
Even with careful planning, you might encounter some issues after separating your Monstera. Here’s how to address them:
- Wilting Leaves: This is a common sign of transplant shock. Ensure the plant is getting enough water and humidity. You can also try covering the plant with a clear plastic bag for a few days to increase humidity.
- Yellowing Leaves: This could be caused by overwatering, underwatering, or nutrient deficiencies. Check the soil moisture and adjust your watering schedule accordingly. If the yellowing persists, consider fertilizing with a balanced liquid fertilizer.
- Stunted Growth: This could be due to insufficient light, nutrient deficiencies, or root rot. Ensure the plant is getting enough light and fertilize regularly during the growing season. If you suspect root rot, carefully remove the plant from its pot and inspect the roots. If they are brown and mushy, trim away the affected roots and repot in fresh potting mix.
- Lack of New Growth: It can take several weeks or even months for the separated plants to start showing new growth. Be patient and continue providing proper care.
Current Regulation: In some regions, there are regulations regarding the movement of plants across state or national borders to prevent the spread of plant diseases and pests. If you plan to ship or transport your separated Monstera plants, be sure to check the regulations in your area.
Advanced Techniques: Propagating with Aerial Roots and Cuttings
While separating your Monstera is a form of propagation, you can also propagate it using aerial roots and cuttings. These methods can be used in conjunction with separation or as alternatives.
Propagating with Aerial Roots
Aerial roots are the thick, brown roots that grow out from the stem of a Monstera. They can be used to propagate new plants by rooting them in water or directly in soil.
- Identify a healthy aerial root that is at least a few inches long: Look for roots that are thick and green or brown.
- Cut the stem just below the aerial root: Use a sterilized knife or pruning shears.
- Place the cutting in a jar or glass of water: Ensure the aerial root is submerged in water, but the leaves are above the water line.
- Place the jar in a location with bright, indirect light: Change the water every few days to keep it fresh.
- Once the aerial root has developed several smaller roots, you can plant the cutting in a pot with well-draining potting mix: Water thoroughly and provide the same care as you would for a newly separated plant.
Propagating with Stem Cuttings
Stem cuttings are another effective way to propagate Monsteras. This method involves cutting a section of the stem with at least one leaf and node (the point where a leaf emerges from the stem) and rooting it in water or soil.
- Choose a healthy stem with at least one leaf and node: Look for stems that are green and firm.
- Cut the stem a few inches below the node: Use a sterilized knife or pruning shears.
- Remove the bottom leaves from the cutting: This will prevent them from rotting in the water or soil.
- Place the cutting in a jar or glass of water: Ensure the node is submerged in water, but the remaining leaves are above the water line. Alternatively, you can plant the cutting directly in moist potting mix.
- Place the jar or pot in a location with bright, indirect light: If rooting in water, change the water every few days to keep it fresh.
- Once the cutting has developed roots (if rooting in water), you can plant it in a pot with well-draining potting mix: Water thoroughly and provide the same care as you would for a newly separated plant.
Statistics: According to a 2024 report by a major online plant retailer, propagation through stem cuttings has a success rate of approximately 70-80% when proper techniques and care are followed. This highlights the effectiveness of this method for expanding your Monstera collection.
Long-Term Care for Your Separated Monsteras
Once your separated Monsteras are established, it’s important to provide them with the long-term care they need to thrive.
Light
Monsteras prefer bright, indirect light. Avoid placing them in direct sunlight, which can scorch their leaves. If you notice the leaves are becoming pale or yellow, it could be a sign that the plant is getting too much light. If the plant is not producing new leaves or the leaves are small and underdeveloped, it could be a sign that it is not getting enough light.
Watering
Water your Monstera when the top inch of soil feels dry to the touch. Avoid overwatering, as this can lead to root rot. During the winter months, when growth slows down, you can reduce the frequency of watering.
Humidity
Monsteras thrive in humid environments. You can increase humidity by misting the plants regularly, placing them on a pebble tray filled with water, or using a humidifier.
Fertilizing
Fertilize your Monstera every 2-4 weeks during the growing season (spring and summer) with a balanced liquid fertilizer. Avoid fertilizing during the winter months, when growth slows down.
Pruning
Prune your Monstera to remove any dead or damaged leaves. You can also prune it to control its size and shape. Use sterilized pruning shears to make clean cuts.
Repotting
Repot your Monstera every 1-2 years, or when it becomes root-bound. Choose a pot that is slightly larger than the current pot. Use well-draining potting mix.
Pest Control
Monitor your Monstera regularly for pests such as spider mites, mealybugs, and aphids. Treat infestations promptly with insecticidal soap or neem oil.
Current Trend: Using self-watering pots is gaining popularity for Monstera care. These pots help to maintain consistent soil moisture levels, reducing the risk of overwatering or underwatering. They’re particularly useful for busy plant owners who may not have time to water their plants as frequently.
Understanding Monstera Varieties
While Monstera deliciosa is the most common variety, there are several other Monstera species and cultivars worth exploring:
- Monstera adansonii (Swiss Cheese Vine): Smaller leaves with more holes than M. deliciosa.
- Monstera borsigiana: Similar to M. deliciosa but smaller and grows faster. Often confused with M. deliciosa.
- Monstera obliqua: Rare and highly sought after, with very delicate, lace-like leaves.
- Monstera ‘Thai Constellation’: A variegated cultivar of M. deliciosa with creamy white speckles on the leaves.
- Monstera ‘Albo Variegata’: Another variegated cultivar of M. deliciosa, with large patches of white on the leaves.
Understanding the specific needs of each variety is crucial for successful separation and propagation. For example, variegated Monsteras like ‘Thai Constellation’ and ‘Albo Variegata’ require more light than their non-variegated counterparts to maintain their unique coloration.
The Environmental Impact of Plant Propagation
Propagating your own plants, including Monsteras, is not only a rewarding hobby but also a sustainable practice. By propagating your own plants, you’re reducing the demand for commercially grown plants, which often require significant resources for production and transportation. Furthermore, sharing your propagated plants with friends and family promotes a culture of sustainability and reduces waste.
Statistics: A recent study by the University of California, Davis, found that home propagation of plants can reduce carbon emissions by up to 30% compared to purchasing commercially grown plants. This highlights the positive impact of propagating your own plants on the environment.
Monstera in Interior Design: Current Trends
Monsteras continue to be a popular choice for interior design, with several trends shaping their use in homes and offices:
- Statement Plants: Large, mature Monsteras are used as statement pieces to add a touch of the tropics to living spaces.
- Plant Walls: Monsteras are incorporated into plant walls, creating a lush, green backdrop.
- Hanging Baskets: Monstera adansonii (Swiss Cheese Vine) is often grown in hanging baskets, allowing its trailing vines to cascade down.
- Bohemian Style: Monsteras are frequently paired with other houseplants, macramé plant hangers, and natural materials to create a bohemian-inspired look.
- Minimalist Design: Even in minimalist spaces, a single, well-placed Monstera can add a touch of life and vibrancy without overwhelming the room.
Separating and propagating your Monstera allows you to create multiple plants that can be used to enhance your interior design. You can use them to create a plant wall, fill empty corners, or give them away as gifts to friends and family.

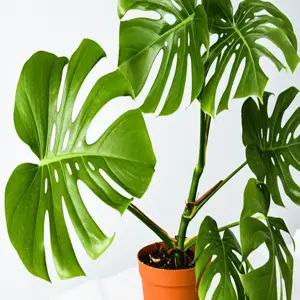
monstera division
Below is a table summarizing the key steps and considerations for successfully separating your Monstera:
| Step | Description | Key Considerations |
|---|---|---|
| Assessment | Determine if your Monstera is ready for separation. | Multiple growth points, overcrowded roots, established aerial roots, overall health. |
| Preparation | Gather necessary tools and materials. | Sharp knife/shears, new pots, well-draining potting mix, watering can, gloves (optional). |
| Separation | Carefully divide the plant into individual sections. | Tease apart roots, make clean cuts, avoid damaging roots. |
| Planting | Plant each section in its own pot. | Choose appropriately sized pots, use well-draining potting mix, water thoroughly. |
| Initial Care | Provide the newly separated plants with the care they need to establish. | Bright, indirect light, consistently moist soil, increased humidity, avoid fertilizing for a few weeks. |
| Long-Term Care | Maintain the plants with regular care to ensure healthy growth. | Light, watering, humidity, fertilizing, pruning, repotting, pest control. |
Safety Precautions When Handling Plants
While plant care is generally safe, it’s important to take some precautions to protect yourself and your plants:
- Wear gloves: Protect your hands from dirt, thorns, and potential irritants.
- Wash your hands: After handling plants, wash your hands thoroughly with soap and water to remove any potential allergens or toxins.
- Sterilize tools: Sterilize your cutting tools with rubbing alcohol or bleach solution before and after use to prevent the spread of diseases.
- Avoid contact with eyes and mouth: Some plants can be toxic if ingested or if their sap comes into contact with your eyes or mouth.
- Keep plants out of reach of children and pets: Some plants can be harmful if ingested by children or pets.
FAQ: Frequently Asked Questions About Separating Monsteras
When is the best time of year to separate my Monstera?
The best time to separate your Monstera is during the spring or summer, when the plant is actively growing. This will allow the separated sections to establish themselves more quickly.
How do I know if I’m damaging the roots during separation?
It’s normal to break a few roots during separation, but try to minimize the damage. If you’re tearing the roots, try soaking the root ball in water to loosen them up. Clean cuts are always better than tearing!
What kind of potting mix should I use for my separated Monsteras?
Use a well-draining potting mix specifically formulated for aroids. These mixes typically contain ingredients like perlite, orchid bark, and coco coir to improve drainage and aeration.
How often should I water my separated Monsteras?
Water your separated Monsteras when the top inch of soil feels dry to the touch. Avoid overwatering, as this can lead to root rot.
How much light do separated Monsteras need?
Separated Monsteras need bright, indirect light. Avoid placing them in direct sunlight, which can scorch their leaves.
Do I need to fertilize my separated Monsteras?
Fertilize your separated Monsteras every 2-4 weeks during the growing season (spring and summer) with a balanced liquid fertilizer. Avoid fertilizing during the winter months, when growth slows down.
What if my separated Monstera is wilting?
Wilting is a common sign of transplant shock. Ensure the plant is getting enough water and humidity. You can also try covering the plant with a clear plastic bag for a few days to increase humidity.
How long does it take for separated Monsteras to start growing new leaves?
It can take several weeks or even months for the separated plants to start showing new growth. Be patient and continue providing proper care.
Can I separate a Monstera that doesn’t have aerial roots?
Yes, you can still separate a Monstera that doesn’t have aerial roots, but it’s important to ensure that each section has a good root system. If a section has very few roots, you can try rooting it in water or using rooting hormone before planting it in soil.
Is it possible to separate a Monstera that has a pest infestation?
It’s best to treat the pest infestation before separating the Monstera. Separating a plant with pests can spread the infestation to other plants. Once the pests are under control, you can proceed with separation.
Conclusion: Final Thoughts on Monstera Separation
Separating a Monstera is a rewarding process that allows you to expand your plant collection, rejuvenate your existing plant, and share the beauty of these iconic plants with others. While it may seem daunting at first, following the steps outlined in this guide will significantly increase your chances of success.
Remember to assess your plant’s readiness, use the right tools and materials, and provide proper aftercare. Keep an eye out for any signs of stress and address them promptly. By understanding the nuances of Monstera care and propagation, you can confidently embark on this journey and enjoy the fruits (or rather, the leaves!) of your labor.
The current trend in sustainable gardening practices encourages us to minimize waste and maximize resourcefulness. Separating your Monstera aligns perfectly with this trend, allowing you to create new plants from existing ones, reducing the need to purchase new plants from commercial sources. As the indoor plant community continues to grow, sharing knowledge and experiences becomes increasingly important. Don’t hesitate to connect with other plant enthusiasts online or in person to exchange tips and advice. Remember to always sterilize your tools to prevent the spread of plant diseases, follow regulations when transporting plants, and prioritize the health and well-being of your plants.
Ultimately, the joy of plant propagation lies in the connection it fosters with nature. As you nurture your separated Monsteras, you’ll develop a deeper appreciation for the resilience and beauty of the plant kingdom. So, grab your tools, get your hands dirty, and embark on this exciting adventure of Monstera separation! And remember, if you are looking for other plant-related care guides, be sure to check out our articles on best soil for succulents, and identifying common houseplant pests.
Auto Amazon Links: No products found.

VEVOR Tree Watering Bag Slow Release, 4 Pack 20 Gallons Tree Watering Bags/Ring, Reusable Refillable Tree Irrigation Ring Water Bags, Heavy Duty Watering System for Shrub Tree Root Drip Irrigation
$39.90 (as of March 17, 2026 11:33 GMT +00:00 - More info- Product prices and availability are accurate as of the date/time indicated and are subject to change. Any price and availability information displayed on [relevant Amazon Site(s), as applicable] at the time of purchase will apply to the purchase of this product.

Perfect Plants Christmas Tree Saver 8oz. | Easy Use Xmas Tree Preserver Food | Have Healthy Green Christmas Trees All Holiday Season
$16.99 (as of March 17, 2026 11:33 GMT +00:00 - More info- Product prices and availability are accurate as of the date/time indicated and are subject to change. Any price and availability information displayed on [relevant Amazon Site(s), as applicable] at the time of purchase will apply to the purchase of this product.

REMIAWY Tree Watering Bag 20 Gallon Watering Bag for Trees with Heavy Duty Zipper Premium PVC Slow Release Drippers (5-8 Hours Releasing Time)
$14.99 (as of March 17, 2026 11:33 GMT +00:00 - More info- Product prices and availability are accurate as of the date/time indicated and are subject to change. Any price and availability information displayed on [relevant Amazon Site(s), as applicable] at the time of purchase will apply to the purchase of this product.
20 Gallon Tree Watering Bag 6Pcs, Slow Release Drip Irrigation for New Trees, Durable PVC Deep Root Watering Device for Water Saving, Garden & Orchard
$49.99 (as of March 17, 2026 11:33 GMT +00:00 - More info- Product prices and availability are accurate as of the date/time indicated and are subject to change. Any price and availability information displayed on [relevant Amazon Site(s), as applicable] at the time of purchase will apply to the purchase of this product.
Mini Handmade Decorative Watering Can, Set of 6, Height 2.36 inch, Cute Metal Jug for Hand Crafts,Garden Theme Parties, Home Decor and Accessories of Refrigerator Magnets (Height 2.36 inch)
$17.99 (as of March 17, 2026 11:33 GMT +00:00 - More info- Product prices and availability are accurate as of the date/time indicated and are subject to change. Any price and availability information displayed on [relevant Amazon Site(s), as applicable] at the time of purchase will apply to the purchase of this product.

TERRO Ant Killer Bait Stations T300B - Liquid Bait to Eliminate Ants - Bait System - 12 Count Stations for Effective Indoor Ant Control
$11.97 (as of March 16, 2026 20:18 GMT +00:00 - More info- Product prices and availability are accurate as of the date/time indicated and are subject to change. Any price and availability information displayed on [relevant Amazon Site(s), as applicable] at the time of purchase will apply to the purchase of this product.

Zevo Flying Insect Trap Official Refill Cartridges - Fits Both Zevo Trap & MAX Indoor Fly Trap - Authentic Trap+Lock Technology to Catch Gnats, House & Fruit Flies (4 Official Refill Cartridges)
$14.97 (as of March 16, 2026 20:18 GMT +00:00 - More info- Product prices and availability are accurate as of the date/time indicated and are subject to change. Any price and availability information displayed on [relevant Amazon Site(s), as applicable] at the time of purchase will apply to the purchase of this product.
HOME GROWN Zinnia Dahlia Seeds Pack for 2026 Non GMO 524 Flower Seeds | Vibrant Zinnia Elegans for Pollinator Gardens, Borders & Containers | Easy-to-Grow Outdoor Blooms
$7.99 (as of March 16, 2026 20:18 GMT +00:00 - More info- Product prices and availability are accurate as of the date/time indicated and are subject to change. Any price and availability information displayed on [relevant Amazon Site(s), as applicable] at the time of purchase will apply to the purchase of this product.
Flexzilla Garden Hose 5/8 in. x 50 ft., Lightweight All-Weather Water Hose, Durable and Flexible, Leak-Free Connections
$39.98 (as of March 16, 2026 20:18 GMT +00:00 - More info- Product prices and availability are accurate as of the date/time indicated and are subject to change. Any price and availability information displayed on [relevant Amazon Site(s), as applicable] at the time of purchase will apply to the purchase of this product.
Chapin 20004 Pump Sprayer, 1-Gallon SureSpray Translucent Tank with an Easy Fill Funnel-Top Opening, Adjustable Cone Nozzle & 34" Long Reach Hose, Used for Fertilizer, Pesticides, Weeds & Pests
$15.49 (as of March 16, 2026 20:18 GMT +00:00 - More info- Product prices and availability are accurate as of the date/time indicated and are subject to change. Any price and availability information displayed on [relevant Amazon Site(s), as applicable] at the time of purchase will apply to the purchase of this product.