Are you interested in planting an amaryllis but not sure where to start? Well, you’ve come to the right place! In this blog article, we will guide you through the process of planting an amaryllis bulb and witnessing its stunning blooms.
Whether you’re a beginner or a seasoned gardener, this step-by-step guide will help you embark on a successful amaryllis planting journey. So let’s dive right in and discover the joys of cultivating this beautiful flowering plant.
Planting an Amaryllis: A Comprehensive Guide
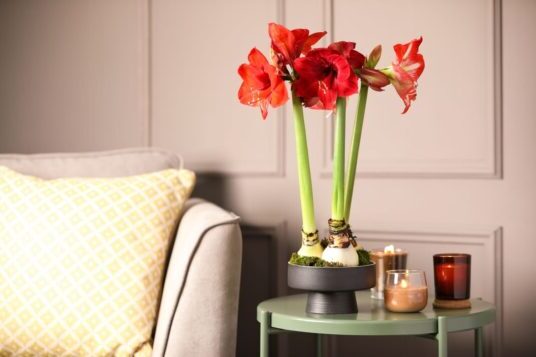
If you’re looking for a beautiful and low-maintenance flowering plant to brighten up your indoor or outdoor space, the amaryllis is a perfect choice. With its stunning blooms and ease of care, planting and growing amaryllis bulbs is a delightful experience that even novice gardeners can enjoy.
In this comprehensive guide, we will walk you through the process of planting an amaryllis, from choosing the right bulb to caring for your plant as it grows and blooms. So, let’s dive in and learn all about the fascinating world of amaryllis!
Choosing the Right Bulb
Before you start planting your amaryllis, it’s essential to select the right bulb. Here are some key considerations to keep in mind:
1. Bulb Size:
Larger bulbs generally produce more flowers and larger blooms. If you want a showstopper amaryllis plant, opt for bulbs that are at least 7-8 centimeters in diameter.
2. Bulb Quality:
Look for firm, plump bulbs without any signs of rot or damage. A healthy bulb will have a solid feel and no soft spots.
3. Variety:
Amaryllis comes in various colors and patterns, so choose a variety that suits your aesthetic preferences. Classic red amaryllis varieties like ‘Red Lion’ and ‘Ferrari’ are popular choices, but there are also stunning options in pink, white, and even striped or multicolored varieties.
Preparing the Planting Pot
Now that you have your amaryllis bulb, it’s time to prepare the planting pot. Here’s what you need to do:
1. Size and Drainage:
Amaryllis bulbs prefer well-draining soil, so choose a pot that is at least 6-8 inches deep and has drainage holes at the bottom. This will prevent waterlogged soil, which can lead to root rot.
2. Potting Mix:
Use a well-balanced potting mix that is rich in organic matter. Avoid heavy soils or those designed for outdoor gardening, as they may retain too much moisture.
3. Pre-soaking the Bulb:
Some gardeners recommend pre-soaking the amaryllis bulb in water for a few hours before planting. While this step is optional, it can help kickstart the growth process.
The Planting Process
Now that your pot is ready, let’s dive into the actual planting process:
1. Fill the Pot:
Fill the pot about 2/3 full with the potting mix, leaving enough space for the roots and bulb.
2. Positioning the Bulb:
Place the bulb in the center of the pot, with the pointed end facing up. The top third of the bulb should remain above the soil surface.
3. Backfill:
Gently backfill the soil around the bulb, ensuring that it is firmly anchored but not overly compacted.
4. Watering:
After planting, give the pot a thorough watering, allowing the excess water to drain away. This will help settle the soil and initiate root growth.
5. Light and Temperature:
Place the pot in a bright location with indirect sunlight. Amaryllis plants prefer temperatures between 60-70°F (15-21°C) during the day and slightly cooler temperatures at night.
Caring for Your Amaryllis
Once you’ve planted your amaryllis bulb, it’s time to care for it and help it thrive. Here are some essential tips:
1. Watering:
Amaryllis plants prefer slightly moist soil, so water them when the top inch of the soil feels dry. Avoid overwatering, as it can lead to bulb rot. During the dormant period, reduce watering to allow the bulb to rest.
2. Fertilizing:
Feed your amaryllis plant with a balanced fertilizer every 2-4 weeks during the growing season. Choose a fertilizer specifically formulated for flowering plants and follow the instructions on the package.
3. Staking:
As your amaryllis grows, it may benefit from staking to support the heavy flower stalks. Gently insert a stake near the bulb and secure the stalks with soft plant ties to prevent them from bending or breaking.
4. Rotating the Pot:
To promote even growth, rotate the pot every few days, allowing all sides of the plant to receive equal sunlight.
5. Deadheading:
Once the flowers start to fade, snip off the spent blooms to prevent seed production. This will redirect the plant’s energy into bulb development and future blooms.
Read More: About How Cold Can Monstera Tolerate
When and How to Re-pot
Over time, your amaryllis bulb may outgrow its pot or deplete the nutrients in the soil. Here’s when and how to re-pot your plant:
1. Timing:
The best time to re-pot your amaryllis is during its dormant period, typically in late winter or early spring, after it has finished flowering.
2. Choosing a New Pot:
Select a pot that is one size larger than the current one. Ensure the new pot has proper drainage holes and use fresh potting mix.
3. Gently Remove the Bulb:
Carefully remove the bulb from the current pot, gently loosening the soil around the roots. Be cautious not to damage the roots or bulb.
4. Reposition and Backfill:
Place the bulb in the new pot, ensuring that the top third remains above the soil surface. Backfill with fresh potting mix, gently firming it around the bulb.
5. Post-repotting Care:
Water the plant thoroughly after repotting and follow the regular care instructions. Keep the newly repotted amaryllis in a warm and bright location, allowing it to acclimate to its new home.
Common Pests and Diseases
While amaryllis plants are generally hardy and pest-resistant, here are some common issues to watch out for:
1. Aphids:
These small, sap-sucking insects can multiply quickly. Use a mild insecticidal soap or a strong spray of water to wash them off the plant.
2. Red Spider Mites:
These tiny pests can cause yellowing leaves and webbing. Increase humidity around the plant and use an insecticidal soap or neem oil to control them.
3. Botrytis Blight:
This fungal disease causes brown spots and rot on leaves, flowers, and bulbs. Provide good air circulation, avoid overwatering, and remove infected plant parts promptly.
4. Narcissus Bulb Fly:
Larvae of this fly can damage bulbs. Avoid overwatering and ensure proper drainage to discourage their presence.
By following proper care practices and monitoring your amaryllis plant regularly, you can prevent and address these issues effectively.
Planting and growing amaryllis is a rewarding experience that brings beauty and elegance to any space. With the right bulb selection, proper planting techniques, and consistent care, you can enjoy vibrant blooms and healthy foliage for years to come.
Remember to choose a healthy bulb, provide proper potting and care, and watch out for common pests and diseases. Now it’s time to unleash your gardening skills and enjoy the stunning beauty of the amaryllis!
Read More: About Growing Plants With A Desk Lamp
Frequently Asked Questions (FAQs)
It is recommended to plant the amaryllis bulb so that its top third is above the soil surface.
The best time to plant an amaryllis bulb is in the early fall, around September or October, before the first frost.
Yes, you can plant an amaryllis bulb in a pot. Use a well-draining potting mix and choose a pot that is at least 6-8 inches deep.
Water your amaryllis plant thoroughly after planting, and then reduce watering. Let the soil dry out slightly between waterings, but do not overwater as it can cause the bulb to rot.
Yes, you should fertilize your amaryllis plant to encourage healthy growth and blooming. Use a balanced fertilizer with equal parts nitrogen, phosphorus, and potassium, and follow the package instructions.
Amaryllis can be grown outdoors in USDA hardiness zones 8-11. In colder climates, it is best to grow amaryllis indoors or treat it as an annual and replant bulbs each year.
From the time of planting, it usually takes 6-8 weeks for an amaryllis bulb to bloom. However, the exact blooming time can vary depending on the variety and environmental conditions.
After the amaryllis blooms, continue to water and fertilize it regularly. Once the flowers fade, cut the flower stalk near the base but let the leaves continue to grow. Keep the plant in a sunny location and provide proper care to help it store energy for the next blooming season.
Final Thoughts
Planting an amaryllis is a rewarding and relatively simple process. Begin by selecting a healthy bulb and a suitable pot. Fill the pot with well-draining soil, leaving some space at the top. Place the bulb in the soil, ensuring that the top third remains above the surface.
Water the bulb thoroughly but avoid overwatering. Find a sunny spot for the pot and keep the soil lightly moist. With proper care and attention, your amaryllis will soon delight you with its vibrant blooms. Happy planting!
Auto Amazon Links: No products found.

VEVOR Tree Watering Bag Slow Release, 4 Pack 20 Gallons Tree Watering Bags/Ring, Reusable Refillable Tree Irrigation Ring Water Bags, Heavy Duty Watering System for Shrub Tree Root Drip Irrigation
$39.90 (as of March 25, 2026 12:50 GMT +00:00 - More info- Product prices and availability are accurate as of the date/time indicated and are subject to change. Any price and availability information displayed on [relevant Amazon Site(s), as applicable] at the time of purchase will apply to the purchase of this product.

REMIAWY Tree Watering Bag 20 Gallon Watering Bag for Trees with Heavy Duty Zipper Premium PVC Slow Release Drippers (5-8 Hours Releasing Time)
$15.99 (as of March 25, 2026 12:50 GMT +00:00 - More info- Product prices and availability are accurate as of the date/time indicated and are subject to change. Any price and availability information displayed on [relevant Amazon Site(s), as applicable] at the time of purchase will apply to the purchase of this product.

Perfect Plants Christmas Tree Saver 8oz. | Easy Use Xmas Tree Preserver Food | Have Healthy Green Christmas Trees All Holiday Season
$16.99 (as of March 25, 2026 12:50 GMT +00:00 - More info- Product prices and availability are accurate as of the date/time indicated and are subject to change. Any price and availability information displayed on [relevant Amazon Site(s), as applicable] at the time of purchase will apply to the purchase of this product.
20 Gallon Tree Watering Bag 6Pcs, Slow Release Drip Irrigation for New Trees, Durable PVC Deep Root Watering Device for Water Saving, Garden & Orchard
$49.99 (as of March 25, 2026 12:50 GMT +00:00 - More info- Product prices and availability are accurate as of the date/time indicated and are subject to change. Any price and availability information displayed on [relevant Amazon Site(s), as applicable] at the time of purchase will apply to the purchase of this product.
Tanzfrosch 12 Pack 20 Gallon Tree Watering Bags, Reusable, Heavy Duty and Slow Release Gator Bags for Trees, Premium PVC Plant Drip Irrigation Bags,5-8 Hours Releasing Time
$124.99 (as of March 25, 2026 12:50 GMT +00:00 - More info- Product prices and availability are accurate as of the date/time indicated and are subject to change. Any price and availability information displayed on [relevant Amazon Site(s), as applicable] at the time of purchase will apply to the purchase of this product.

TERRO Ant Killer Bait Stations T300B - Liquid Bait to Eliminate Ants - Bait System - 12 Count Stations for Effective Indoor Ant Control
$10.49 (as of March 25, 2026 00:50 GMT +00:00 - More info- Product prices and availability are accurate as of the date/time indicated and are subject to change. Any price and availability information displayed on [relevant Amazon Site(s), as applicable] at the time of purchase will apply to the purchase of this product.
Zevo Flying Insect Trap Official Refill Cartridges - Fits Both Zevo Trap & MAX Indoor Fly Trap - Authentic Trap+Lock Technology to Catch Gnats, House & Fruit Flies (4 Official Refill Cartridges)
$14.97 (as of March 25, 2026 00:50 GMT +00:00 - More info- Product prices and availability are accurate as of the date/time indicated and are subject to change. Any price and availability information displayed on [relevant Amazon Site(s), as applicable] at the time of purchase will apply to the purchase of this product.
Flexzilla Garden Hose 5/8 in. x 50 ft., Lightweight All-Weather Water Hose, Durable and Flexible, Leak-Free Connections
$39.97 (as of March 25, 2026 00:50 GMT +00:00 - More info- Product prices and availability are accurate as of the date/time indicated and are subject to change. Any price and availability information displayed on [relevant Amazon Site(s), as applicable] at the time of purchase will apply to the purchase of this product.

Ortho Home Defense Insect Killer for Indoor and Perimeter2 with Comfort Wand - Ready-To-Use Bug Spray, Kills Ants, Cockroaches & Spiders, 1.33 gal.
$16.99 (as of March 25, 2026 00:50 GMT +00:00 - More info- Product prices and availability are accurate as of the date/time indicated and are subject to change. Any price and availability information displayed on [relevant Amazon Site(s), as applicable] at the time of purchase will apply to the purchase of this product.
Chapin 20004 Pump Sprayer, 1-Gallon SureSpray Translucent Tank with an Easy Fill Funnel-Top Opening, Adjustable Cone Nozzle & 34" Long Reach Hose, Used for Fertilizer, Pesticides, Weeds & Pests
$15.49 (as of March 25, 2026 00:50 GMT +00:00 - More info- Product prices and availability are accurate as of the date/time indicated and are subject to change. Any price and availability information displayed on [relevant Amazon Site(s), as applicable] at the time of purchase will apply to the purchase of this product.