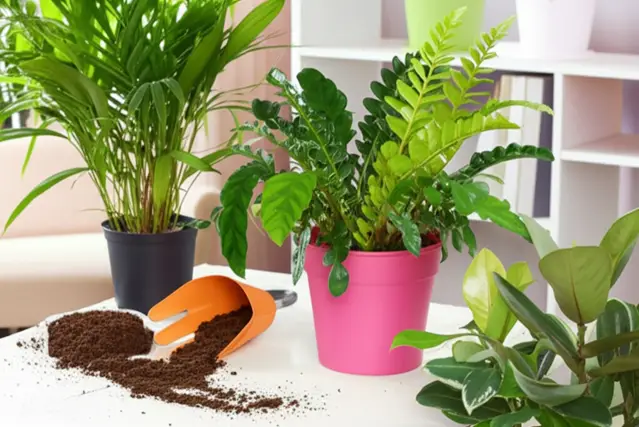
Congratulations on your new plant baby! Bringing greenery into your home is a fantastic way to brighten your space, improve air quality (to a degree – studies are ongoing, more on that later!), and boost your overall well-being. But as soon as you get that little green friend home, a common question pops into every plant parent’s head: “Should I repot this thing right now?”
We’ll delve into the reasons why nurseries sometimes use less-than-ideal soil, the telltale signs your plant *needs* a new pot, the potential risks of immediate repotting, and the best practices to ensure a smooth and successful transition. Get ready to become a repotting pro!
According to a recent survey by the National Garden Bureau, indoor plant ownership has surged by over 20% in the past five years, with millennials and Gen Z driving the trend. This means more first-time plant parents facing this very repotting dilemma. Let’s get you equipped with the knowledge you need!
Why Are Plants Often Sold in Less-Than-Ideal Soil? The Nursery Perspective
Before we jump into whether or not to repot, it’s important to understand why plants are often sold in the soil they’re in. It’s usually not because the nursery is trying to sabotage your green dreams! There are several practical and economic reasons behind this choice:
new plant care
Cost-Effectiveness
Nurseries operate on tight margins. Using high-quality, nutrient-rich potting mixes for every single plant can significantly increase their costs. Cheaper, commercially available mixes, often containing a high percentage of peat moss, perlite, or vermiculite, are simply more economical for large-scale operations.
Weight and Transportation
Soil weight is a major factor in shipping costs. Lighter mixes, like those heavily composed of peat moss or coco coir, reduce the overall weight of the plants, making them cheaper to transport. This is particularly important for nurseries that ship plants across long distances.
Water Retention and Drainage Management
Nurseries need to water a *lot* of plants efficiently. Some mixes are chosen for their specific water retention properties, allowing for easier watering schedules and reduced risk of over or under-watering in a controlled nursery environment. While these mixes might work well in a greenhouse, they may not be ideal for the varied conditions of a home environment.
Sterility and Disease Control
Commercial potting mixes are often sterilized to prevent the spread of diseases and pests. While this is a positive aspect, the sterilization process can also kill beneficial microbes that contribute to plant health in the long run. This is why supplementing with beneficial bacteria and fungi is often recommended after repotting.
Standardization for Propagation
Nurseries often use standardized mixes to ensure consistent results during propagation and early growth stages. This allows them to predict growth rates and manage large numbers of plants more effectively.
Real-world example: A local nursery owner explained to me that they use a peat-based mix for most of their seedlings because it’s lightweight, retains moisture well (which is crucial in their climate-controlled greenhouse), and is relatively inexpensive. However, they always advise customers to repot into a more nutrient-rich mix after bringing the plants home.
Is Repotting Necessary? Identifying the Signs Your Plant Needs a New Home
Now that you understand why plants are often sold in less-than-perfect soil, let’s look at the signs that indicate your plant is actually *asking* for a new pot. Don’t just assume you need to repot immediately. Observe your plant carefully!
Roots Circling the Pot (Root-Bound)
This is one of the most common and obvious signs. Gently remove the plant from its pot (if you can!). If you see a dense, tangled mass of roots circling the inside of the pot, your plant is root-bound. The roots have run out of space to grow and are essentially choking themselves. This is especially true if the roots are growing out of the drainage holes.
Slowed Growth or Stunted Development
If your plant seems to have stopped growing, or if its new growth is small and weak, it could be a sign that the roots are constricted and unable to absorb enough nutrients. Compare the growth to what is typically expected for that species under similar conditions.
Water Draining Very Quickly
If water runs straight through the pot without the soil absorbing any moisture, it could indicate that the soil is compacted or that the roots are so dense that they’re preventing water from reaching the soil. This means the plant isn’t getting the water it needs.
Frequent Wilting Despite Regular Watering
Even if you’re watering regularly, a root-bound plant may wilt frequently because the roots are unable to absorb enough water to keep the plant hydrated. This is often accompanied by yellowing or browning leaves.
Salt Buildup on the Soil Surface or Pot
White crusty deposits on the soil surface or around the rim of the pot are usually mineral salts from tap water and fertilizers. While some buildup is normal, excessive buildup can indicate that the soil isn’t draining properly and that the plant isn’t able to effectively absorb nutrients. This can be exacerbated by poor soil quality.
The Plant is Top-Heavy
If the plant’s foliage is disproportionately large compared to the size of the pot, it may be at risk of tipping over. This can also indicate that the roots are underdeveloped and unable to support the weight of the plant.
Soil Compaction
If the soil feels hard and compacted, it may be preventing proper drainage and aeration, making it difficult for the roots to breathe and absorb nutrients. You might notice water pooling on the surface of the soil after watering.
Visible Pests or Diseases
While repotting won’t necessarily *cure* pests or diseases, it can give you an opportunity to inspect the roots for signs of root rot or other problems, and to replace the infested soil with fresh, clean potting mix. However, treating the pest or disease directly is crucial.
Table: Signs Your Plant Needs Repotting
| Sign | Possible Cause | Action to Take |
|---|---|---|
| Roots Circling the Pot | Root-bound | Repot into a larger pot |
| Slowed Growth | Root constriction, nutrient deficiency | Repot and fertilize |
| Water Draining Very Quickly | Compacted soil, dense roots | Repot with fresh soil |
| Frequent Wilting | Root-bound, poor water absorption | Repot and check watering habits |
| Salt Buildup | Poor drainage, hard water | Repot and use filtered water |
| Top-Heavy Plant | Underdeveloped roots | Repot into a larger, heavier pot |
| Soil Compaction | Poor soil quality | Repot with well-draining soil |
| Visible Pests/Diseases | Infestation, root rot | Repot with fresh soil and treat the problem |
The Downside: Potential Risks of Repotting Too Soon
While there are valid reasons to repot a new plant, there are also risks associated with doing it immediately. Repotting, even done correctly, is a stressful process for plants. Here’s why:
Root Disturbance and Transplant Shock
The roots are the lifeline of the plant. Repotting inevitably involves disturbing the roots, even if you’re being gentle. This disturbance can lead to transplant shock, which can manifest as wilting, leaf drop, slowed growth, or even death. The plant needs time to recover from this stress.
Change in Environment
Moving a plant from the controlled environment of a nursery to your home is already a significant change. Repotting adds another layer of stress by changing the soil composition, drainage, and potentially the pot size and material. Allowing the plant to acclimate to its new home before repotting can minimize this stress.
Overwatering
When you repot, you’re introducing the plant to a fresh batch of soil. New soil retains more moisture than old, compacted soil. If you’re not careful, you can easily overwater the plant, leading to root rot. Adjust your watering schedule accordingly after repotting.
Nutrient Imbalance
Different potting mixes have different nutrient profiles. Repotting into a mix that’s significantly different from the original can disrupt the plant’s nutrient balance. Start with a general-purpose potting mix and adjust as needed based on the plant’s specific needs.
Damage to Delicate Roots
New plants, especially those propagated from cuttings, often have delicate and underdeveloped root systems. Handling these roots roughly during repotting can easily damage them, hindering the plant’s ability to absorb water and nutrients.
Unnecessary Stress
Sometimes, a plant is perfectly happy in its original pot and soil, at least for a while. Repotting a healthy, thriving plant simply for the sake of it is unnecessary and can actually do more harm than good. “If it ain’t broke, don’t fix it!”
Statistic: Studies have shown that plants repotted within the first two weeks of purchase have a significantly higher rate of transplant shock compared to plants allowed to acclimate for at least a month.
The Importance of Acclimation: Giving Your Plant Time to Adjust
The acclimation period is crucial for a new plant’s survival. Think of it as giving your plant time to de-stress, adjust to its new environment, and prepare for the (potential) repotting process. Here’s how to do it right:
Placement and Lighting
Place your new plant in a location that suits its light requirements. Research the specific needs of your plant species. Avoid placing it in direct sunlight immediately, as this can scorch the leaves, especially if it was previously grown in a shaded greenhouse. Gradually introduce it to brighter light over a period of days or weeks.
Watering
Check the soil moisture regularly. Don’t automatically water your plant just because it’s new. Allow the top inch or two of soil to dry out before watering again. Overwatering is a common mistake that can lead to root rot.
Humidity
Consider the humidity needs of your plant. Many indoor plants, especially tropical varieties, prefer higher humidity levels. You can increase humidity by using a humidifier, placing the plant on a pebble tray filled with water, or grouping plants together.
Temperature
Maintain a consistent temperature range that’s suitable for your plant species. Avoid placing the plant near drafts, heating vents, or air conditioning units.
Observation
The most important part of acclimation is simply observing your plant. Watch for signs of stress, such as wilting, leaf drop, yellowing, or browning. Adjust your care as needed based on your observations.
How Long to Acclimate
A general rule of thumb is to allow your plant to acclimate for at least 2-4 weeks before repotting. However, this can vary depending on the plant species, the size of the plant, and the conditions in your home. If your plant is showing signs of stress, wait longer.
Real-world example: I recently bought a Fiddle Leaf Fig. I knew they are notoriously sensitive to changes in environment. I kept it in its nursery pot for six weeks, only watering when the topsoil was dry. After that, and *only* after seeing new leaf growth, I repotted it, and it thrived!
Exceptions to the Rule: When Immediate Repotting Might Be Necessary
While waiting is generally recommended, there are situations where immediate repotting is the best course of action:
Severe Root Rot
If you notice signs of severe root rot, such as mushy, black, or foul-smelling roots, immediate repotting is crucial. Remove the plant from its pot, carefully trim away any affected roots, and repot into fresh, well-draining soil. Treat with a fungicide if necessary.
Major Pest Infestation in the Soil
If the soil is heavily infested with pests, such as fungus gnats or root mealybugs, repotting can help to eliminate the infestation. Dispose of the old soil carefully and clean the pot thoroughly before repotting.
Planted in Plug Starter
Many times houseplants are sold while still inside of their plug starter. A plug starter is a small container that houses a very young seedling. Nurseries do this to minimize costs, and it is best to repot this immediately for the plant’s sake.
Extremely Poor Soil Quality
In rare cases, the soil may be so compacted or poorly draining that it’s suffocating the roots. If the soil is rock-hard and the plant is showing signs of distress, immediate repotting into a better-quality mix may be necessary.
Damaged Pot
If the pot is cracked, broken, or otherwise damaged, you’ll need to repot the plant to prevent further damage to the roots and to ensure proper drainage.
Inappropriate Potting Medium for Plant
Sometimes the plants are potted with the wrong medium. For example, succulents and cacti do not fare well in soil that retains moisture. If they are found in one, it is crucial to repot the plant into a potting medium with good drainage and aeration.
Important Note: Even in these situations, be as gentle as possible when repotting to minimize stress on the plant. Provide extra care and attention during the recovery period.
The Repotting Process: A Step-by-Step Guide to Success
If you’ve decided that repotting is necessary, here’s a step-by-step guide to ensure a smooth and successful transition:
Gather Your Supplies
You’ll need:
- A new pot (choose one that’s 1-2 inches larger in diameter than the old pot)
- High-quality potting mix (appropriate for your plant species)
- Watering can or hose
- Gloves (optional)
- Trowel or small shovel
- Sharp, clean scissors or pruning shears (for trimming roots)
- A tray or newspaper to catch soil spills
Prepare the New Pot
If the new pot doesn’t have drainage holes, drill some. Place a layer of gravel or broken pottery at the bottom of the pot to improve drainage (this is somewhat debated, but many gardeners still find it helpful). Add a layer of fresh potting mix, filling the pot about one-third of the way.
Remove the Plant from the Old Pot
Gently loosen the soil around the edges of the pot. Invert the pot and tap gently on the bottom to dislodge the plant. If the plant is stuck, you may need to use a trowel to carefully loosen the soil around the edges.
Inspect the Roots
Once the plant is out of the pot, carefully inspect the roots. Remove any dead, damaged, or circling roots with your scissors or pruning shears. Gently loosen the remaining roots to encourage them to spread out in the new pot.
Read More: Should I Put Rocks in the Bottom of My Planter Pot? (2025)
Position the Plant in the New Pot
Place the plant in the center of the new pot, making sure the top of the root ball is level with the top of the pot. Add more potting mix around the sides of the root ball, gently pressing it down to eliminate air pockets.
Water Thoroughly
Water the plant thoroughly until water drains out of the drainage holes. This will help to settle the soil and ensure that the roots are properly hydrated.
Fertilize (Optional)
You can add a diluted liquid fertilizer after repotting, but it’s not always necessary. If you do fertilize, use a balanced fertilizer at half-strength to avoid burning the roots.
Monitor and Adjust
Keep an eye on your plant in the days and weeks following repotting. Watch for signs of stress, such as wilting or leaf drop. Adjust your watering schedule and lighting as needed to help the plant recover.
Table: The Repotting Process Summarized
| Step | Description | Why It’s Important |
|---|---|---|
| Gather Supplies | Collect pot, soil, tools | Ensures a smooth process |
| Prepare New Pot | Add drainage and soil | Provides a good foundation |
| Remove Plant | Gently dislodge from old pot | Minimizes root damage |
| Inspect Roots | Trim dead/circling roots | Encourages healthy growth |
| Position Plant | Place in new pot, add soil | Ensures proper root placement |
| Water Thoroughly | Saturate the soil | Hydrates the roots and settles the soil |
| Fertilize (Optional) | Add diluted fertilizer | Provides nutrients for growth |
| Monitor and Adjust | Observe for signs of stress | Allows for timely intervention |
Selecting the Perfect Potting Mix: A Recipe for Plant Success
Choosing the right potting mix is just as important as choosing the right pot size. The ideal potting mix will provide good drainage, aeration, and nutrient retention. Here’s what to consider:
Plant-Specific Needs
Different plants have different soil requirements. Research the specific needs of your plant species. For example, succulents and cacti need well-draining soil, while tropical plants prefer a more moisture-retentive mix. There are potting mixes specifically formulated for certain types of plants, such as African violets, orchids, and cacti.
Ingredients to Look For
- Peat Moss: Retains moisture and provides good aeration. However, it’s not the most sustainable option (more on that below).
- Coco Coir: A sustainable alternative to peat moss, made from coconut husks. It has similar water retention and aeration properties.
- Perlite: Improves drainage and aeration. It’s made from volcanic glass that has been heated and expanded.
- Vermiculite: Retains moisture and nutrients. It’s made from a mineral that has been heated and expanded.
- Compost: Provides nutrients and improves soil structure.
- Sand: Improves drainage, especially for succulents and cacti. Use horticultural sand, not play sand.
- Bark Fines: Improves drainage and aeration, especially for orchids and other epiphytic plants.
DIY Potting Mix Recipes
You can also create your own potting mix by combining different ingredients. Here are a few popular recipes:
- General Purpose Mix: 1 part peat moss or coco coir, 1 part perlite, 1 part vermiculite
- Succulent Mix: 1 part potting soil, 1 part perlite, 1 part sand
- Orchid Mix: 2 parts bark fines, 1 part perlite, 1 part charcoal
The Sustainability Debate: Peat Moss vs. Coco Coir
Peat moss has been a staple ingredient in potting mixes for decades, but its use is increasingly controversial due to its environmental impact. Peat bogs are slow-growing ecosystems that store vast amounts of carbon. Harvesting peat moss releases this carbon into the atmosphere, contributing to climate change. Coco coir is a more sustainable alternative, as it’s a byproduct of the coconut industry.
Current Trend: Many gardeners are switching to coco coir-based potting mixes to reduce their environmental footprint. Some nurseries are also phasing out peat moss in their mixes.
Picking the Perfect Pot: Material, Size, and Drainage
The pot you choose will also play a significant role in your plant’s health. Consider the following factors:

transplant shock
Material
- Terracotta: Porous and allows for good drainage and aeration. It’s a good choice for plants that prefer dry soil.
- Plastic: Lightweight and inexpensive. It retains moisture better than terracotta, making it a good choice for plants that prefer moist soil.
- Ceramic: Offers a wide variety of styles and colors. It’s less porous than terracotta but more porous than plastic.
- Glazed Ceramic: Non-porous and retains moisture well. Be careful not to overwater plants in glazed ceramic pots.
- Wood: Can be aesthetically pleasing, but it can rot over time. Use treated wood or line the pot with plastic.
Size
Choose a pot that’s 1-2 inches larger in diameter than the old pot. Going too big can lead to overwatering, as the soil will stay wet for too long. Going too small will restrict root growth.
Drainage
Drainage is crucial for preventing root rot. Make sure the pot has drainage holes at the bottom. If the pot doesn’t have drainage holes, you can drill some yourself (use a diamond-tipped drill bit for ceramic pots).
Aesthetics
Of course, you also want a pot that looks good! Choose a style and color that complements your plant and your home decor. Just remember that function should come before form.
Table: Pot Material Pros and Cons
| Material | Pros | Cons |
|---|---|---|
| Terracotta | Good drainage, aeration, natural look | Dries out quickly, can be brittle |
| Plastic | Lightweight, inexpensive, retains moisture | Can be less aesthetically pleasing |
| Ceramic | Variety of styles, moderate drainage | Can be heavy, more expensive |
| Glazed Ceramic | Retains moisture, decorative | Easy to overwater |
| Wood | Natural look | Can rot, needs lining |
Post-Repotting Care: Nurturing Your Plant Back to Health
Repotting is stressful for plants, so it’s important to provide extra care in the days and weeks following the procedure:
Watering
Water thoroughly after repotting, but then allow the soil to dry out slightly before watering again. Overwatering is a common cause of problems after repotting.
Lighting
Place the plant in a location that provides the appropriate amount of light. Avoid direct sunlight immediately after repotting, as this can stress the plant further.
Humidity
Increase humidity if necessary. You can use a humidifier, pebble tray, or group plants together.
Temperature
Maintain a consistent temperature range that’s suitable for your plant species.
Fertilizing
Wait a few weeks before fertilizing. When you do fertilize, use a diluted liquid fertilizer at half-strength to avoid burning the roots.
Monitoring
Keep a close eye on your plant for signs of stress, such as wilting, leaf drop, yellowing, or browning. Adjust your care as needed based on your observations.
Read More: 4 Tips Sunlight for Indoor Plants: Thriving in 2025!
Patience
Be patient! It can take several weeks or even months for a plant to fully recover from repotting. Don’t be discouraged if you don’t see immediate results. Just continue to provide proper care, and your plant will eventually thrive.
rootbound symptoms
Trend Alert: Many plant parents are now using mycorrhizal fungi inoculants when repotting. These beneficial fungi help the plant establish a strong root system and improve nutrient uptake, reducing transplant shock.
Frequently Asked Questions (FAQ)
Here are some frequently asked questions about repotting indoor plants:
How often should I repot my indoor plants?
The frequency of repotting depends on the plant species, the size of the pot, and the growth rate of the plant. As a general rule, most indoor plants need to be repotted every 1-2 years. However, some slow-growing plants may only need to be repotted every 3-4 years.
What is the best time of year to repot my indoor plants?
The best time of year to repot most indoor plants is in the spring or early summer, when they are actively growing. This allows them to recover quickly from the stress of repotting and establish new roots.
Can I repot a plant that is flowering?
It’s generally best to avoid repotting a plant that is actively flowering, as this can disrupt the flowering process. However, if the plant is severely root-bound or showing signs of distress, it may be necessary to repot it even if it’s flowering.
What size pot should I use when repotting?
Choose a pot that’s 1-2 inches larger in diameter than the old pot. Going too big can lead to overwatering, while going too small will restrict root growth.
What kind of potting mix should I use?
Choose a potting mix that’s appropriate for your plant species. General-purpose potting mixes are suitable for most indoor plants, but some plants may prefer a more specialized mix, such as a succulent mix or an orchid mix. Refer back to the section on “Selecting the Perfect Potting Mix” for more details.
How do I know if my plant is root-bound?
Look for signs such as roots circling the pot, slow growth, frequent wilting, or water draining very quickly. Gently remove the plant from its pot to inspect the roots. If you see a dense, tangled mass of roots, your plant is root-bound.
What is transplant shock, and how can I prevent it?
Transplant shock is the stress that plants experience when they are repotted. It can manifest as wilting, leaf drop, slowed growth, or even death. To prevent transplant shock, be as gentle as possible when repotting, and provide extra care in the days and weeks following the procedure. Acclimating your plant beforehand is crucial.
Can I reuse old potting mix?
It’s generally not a good idea to reuse old potting mix, as it may be depleted of nutrients and contain harmful pathogens. However, if you’re on a tight budget, you can sterilize old potting mix by baking it in the oven at 200 degrees Fahrenheit for 30 minutes. Let it cool completely before using it.
How do I dispose of old potting mix?
You can compost old potting mix, as long as it doesn’t contain any harmful pathogens or pests. Alternatively, you can dispose of it in your regular trash.
My plant is still wilting after repotting. What should I do?
Wilting after repotting is often a sign of transplant shock. Make sure you’re watering properly, providing adequate light, and increasing humidity if necessary. Be patient and continue to monitor the plant. It may take several weeks for it to fully recover.
Final Thoughts: The Art of Plant Parenthood and the Repotting Decision
Ultimately, the decision of whether or not to repot a newly purchased indoor plant is a matter of careful observation and informed judgment. There’s no one-size-fits-all answer, and it’s crucial to consider your plant’s individual needs and the specific conditions in your home. Don’t be afraid to get your hands dirty, inspect the roots, and trust your instincts.
Remember that repotting, while sometimes necessary, is a stressful event for plants. Prioritize acclimation, minimize root disturbance, and provide extra care in the days and weeks following the procedure. By understanding the reasons why nurseries use certain soil mixes, recognizing the signs that your plant needs a new home, and following the best practices for repotting, you can significantly increase your chances of success.
Plant parenthood is a journey of learning and experimentation. Don’t be afraid to make mistakes – that’s how we learn and grow! With a little patience, observation, and a dash of plant-loving intuition, you can create a thriving indoor jungle that brings joy and beauty to your life. The recent surge in indoor plant popularity reflects a growing awareness of the benefits of connecting with nature, even within the confines of our homes. By taking the time to understand our plants’ needs, we can foster a mutually beneficial relationship that enriches both our lives and the lives of our leafy companions.
So, take a deep breath, assess your new plant friend, and make the repotting decision with confidence. Happy growing!
Auto Amazon Links: No products found.

VEVOR Tree Watering Bags Slow Release, 4 Pack 16 Gallons Tree Watering Ring, Reusable Refillable Tree Irrigation Ring Water Bags, Heavy Duty Watering System for Shrub Tree Root Drip Irrigation
$29.99 (as of March 3, 2026 07:54 GMT +00:00 - More info- Product prices and availability are accurate as of the date/time indicated and are subject to change. Any price and availability information displayed on [relevant Amazon Site(s), as applicable] at the time of purchase will apply to the purchase of this product.
Perfect Plants Christmas Tree Saver 8oz. | Easy Use Xmas Tree Preserver Food | Have Healthy Green Christmas Trees All Holiday Season
$16.99 (as of March 3, 2026 07:54 GMT +00:00 - More info- Product prices and availability are accurate as of the date/time indicated and are subject to change. Any price and availability information displayed on [relevant Amazon Site(s), as applicable] at the time of purchase will apply to the purchase of this product.
Mini Decorative Watering Can, Set of 6, Height 1.97 inch, Cute Metal Jug for Hand Crafts,Garden Theme Parties and Home Decor
$8.99 (as of March 3, 2026 07:54 GMT +00:00 - More info- Product prices and availability are accurate as of the date/time indicated and are subject to change. Any price and availability information displayed on [relevant Amazon Site(s), as applicable] at the time of purchase will apply to the purchase of this product.
Mini Handmade Decorative Watering Can, Set of 6, Height 1.42 inch, Cute Metal Jug for Hand Crafts,Garden Theme Parties,Home Decor and Accessories of Refrigerator Magnets (Silver, Height 1.42 inch)
$13.99 (as of March 3, 2026 07:54 GMT +00:00 - More info- Product prices and availability are accurate as of the date/time indicated and are subject to change. Any price and availability information displayed on [relevant Amazon Site(s), as applicable] at the time of purchase will apply to the purchase of this product.
Wilt-Pruf® Christmas Tree/Cutting Preserver Spray |Preserves Christmas Trees, Wreaths, Garlands, Cuttings and Carved Pumpkins | Reduces Needle Drop | Keeps Cut Trees Fresh Longer | Natural (32 oz)
$21.99 (as of March 3, 2026 07:54 GMT +00:00 - More info- Product prices and availability are accurate as of the date/time indicated and are subject to change. Any price and availability information displayed on [relevant Amazon Site(s), as applicable] at the time of purchase will apply to the purchase of this product.

TERRO Ant Killer Bait Stations T300B - Liquid Bait to Eliminate Ants - Bait System - 12 Count Stations for Effective Indoor Ant Control
$11.97 (as of March 3, 2026 14:38 GMT +00:00 - More info- Product prices and availability are accurate as of the date/time indicated and are subject to change. Any price and availability information displayed on [relevant Amazon Site(s), as applicable] at the time of purchase will apply to the purchase of this product.
OLANLY Dog Door Mat for Muddy Paws 30x20, Absorbs Moisture and Dirt, Absorbent Non-Slip Washable Doormat, Quick Dry Chenille Mud Mat for Dogs, Entry Indoor Entryway Carpet for Inside Floor, Grey
$9.49 (as of March 3, 2026 14:38 GMT +00:00 - More info- Product prices and availability are accurate as of the date/time indicated and are subject to change. Any price and availability information displayed on [relevant Amazon Site(s), as applicable] at the time of purchase will apply to the purchase of this product.
HOME GROWN Zinnia Dahlia Seeds Pack for 2026 Non GMO 524 Flower Seeds | Vibrant Zinnia Elegans for Pollinator Gardens, Borders & Containers | Easy-to-Grow Outdoor Blooms
$7.99 (as of March 3, 2026 14:38 GMT +00:00 - More info- Product prices and availability are accurate as of the date/time indicated and are subject to change. Any price and availability information displayed on [relevant Amazon Site(s), as applicable] at the time of purchase will apply to the purchase of this product.
Zevo Flying Insect Trap Official Refill Cartridges - Fits Both Zevo Trap & MAX Indoor Fly Trap - Authentic Trap+Lock Technology to Catch Gnats, House & Fruit Flies (4 Official Refill Cartridges)
$14.97 (as of March 3, 2026 14:38 GMT +00:00 - More info- Product prices and availability are accurate as of the date/time indicated and are subject to change. Any price and availability information displayed on [relevant Amazon Site(s), as applicable] at the time of purchase will apply to the purchase of this product.
Wagner's 53002 Farmer's Delight Wild Bird Food with Cherry Flavor, 10-Pound Bag
$12.48 (as of March 3, 2026 14:38 GMT +00:00 - More info- Product prices and availability are accurate as of the date/time indicated and are subject to change. Any price and availability information displayed on [relevant Amazon Site(s), as applicable] at the time of purchase will apply to the purchase of this product.